
If your builds look fine but Wuthering Waves team comps keep missing stars, the cause is usually one of three things: teams assigned to the wrong floors, echo cost overspent on the wrong squad, or sub-stats pushed in the wrong direction. This guide gives the three-team table, the 12-point echo budget, the separate sub-stat targets for carries and supports, and the material scale behind one fully built character.
 1
| Item | Verdict | Basis |
|---|---|---|
| Tower structure | Three towers, three teams for the deep zone | Characters cannot be reused (in-game Tower rules) |
| Echo cost | 4-3-3-1-1 equals 12 points | Five slots, fixed cost ceiling |
| Carry stats | 60 percent crit rate, 120 percent crit damage | Below this, fix stats before rotation |
| Support stats | Energy regen only | Crit stats on supports crowd out the carry |
Applicable version: 3.7 (live 2026-09-30; store build 3.7.2 updated 2026-10-16, confirm details in official notices)

Wuthering Waves 3.7 Tower of Adversity structure
The Tower of Adversity splits into three towers, and the deep zone requires three squads with no shared characters . That rule drives everything: you cannot put your best support in all three teams, so decide up front which squad gets the carry and which squad gets leftovers.
Stars are decided by time
Each floor awards stars based on time remaining, so faster clears score higher . The Tower is not a "can I clear it" check; it is a check on how dense your damage windows are.
Three teams is not three finished teams
A Wuthering Waves best teams setup is one fully built carry squad, one squad where a sub-carry takes the main slot, and one squad built purely to survive. Splitting resources evenly is the most common mistake, because only your fastest floors score, so even splits leave all three teams too slow.
Wuthering Waves 3.7 three-team setup
| Team | Role | Characters | Echoes | Rotation |
|---|---|---|---|---|
| Team one | Fully built carry | Carry, damage amp, healer or shielder | Carry on 4-3-3-1-1 | Amp first, then burst |
| Team two | Sub-carry | Sub-carry, battery, survival | Sub-carry on 4-4-1-1-1 | Battery builds energy first |
| Team three | Survival | Two supports, one survival | All on 3-3-3-1-1 | Stay alive, ignore speed |
Team one rotation
Team one exists to land the carry's burst inside the amp window. Apply the amp and resistance shred from supports first, then enter the burst; doing it the other way around means the burst finishes before the buff lands.
Teams two and three
Team two needs a dedicated battery because the sub-carry cannot fund its own rotation. Team three only needs to survive, so cheap echo sets are correct there. That is why the investment order is carry squad fully built, second squad functional, third squad unkillable.

Wuthering Waves echo cost and main echo choice
Echoes use five slots on a 4-3-3-1-1 cost split for 12 points total . The main echo at the 4-cost slot defines the set skill, and the other four slots supply main stats, so a wrong main echo wastes the entire build.
Picking the main echo
Prioritize main echoes that grant skill damage or elemental damage, then healing and shielding sets . The test is simple: identify whether your carry deals damage through normal attacks, heavy attacks, or resonance skill, then confirm the main echo buffs that specific channel.
Cost is a ceiling, not a target
Twelve points is the maximum, not the goal. A survival squad runs fine on 3-3-3-1-1, leaving the 4-cost slot to team one. The point is not to max every squad; it is to allocate cost by role.

Wuthering Waves echo sub-stats: carries and supports differ
Carry sub-stats go crit rate, crit damage, then attack percent. Support sub-stats go energy regen, HP percent, then defense percent. Mixing the two lines makes them compete for the same multiplier slots.
Where to stop on a carry
Crit rate 60 percent, crit damage 120 percent is the usable line, with 120 percent energy regen keeping the rotation alive . Below that line, fix stats before practicing rotation, because rotation buys 5 to 10 percent while stats are often worth 30 percent or more.
Why supports should not chase crit
Support damage is typically under 15 percent of total team output, so stacking crit on a support is worth far less than moving that same echo to the carry. A support that keeps energy flowing so the carry gets its amp every cycle has already done its job.

Wuthering Waves 3.7 resource requirements
Taking one character from level one to max crosses three separate lines: level ascension, skill upgrades, and echo tuning . Those resources do not convert into each other, so measure the gap before farming.
| Item | Scale | Conversion |
|---|---|---|
| Shell credits | Millions | Spent on levels and skills |
| Ascension materials | Four tiers | One farm stage per tier |
| Echo tuning | Five slots, multiple rolls | Sub-stats are random, budget rerolls |
| Daily waveplates | 240 | Feed the carry line first |
A workable weekly order
Monday to Wednesday on the carry's ascension materials, Thursday to Friday on echo tuning fodder, weekend on skill materials. Echo sub-stats are the most random part, so leave a reroll window instead of scheduling them last.
Wuthering Waves 3.7: who is worth building
Verdict first: if you are one or two floors short, building a damage amp support who fits team one is worth more than building a third carry. If all three squads already function, only build a character who can replace an existing carry (source: the general criteria behind the Wuthering Waves tier list, plus the in-game Tower structure).
Three account types
New accounts: build one carry and one healer, clear the early floors, and stay out of the deep zone. Mid-game accounts: fill the battery slot in team two, which is the single best value step available. Veterans: fill elemental gaps, since each Tower rotation changes enemy elements and one missing element costs a floor.
Build order versus pull order
Check your builds before your banner plans. A character you pull but cannot build is a storage slot; pushing an existing carry from 50/100 to 60/120 is immediately visible in clear times.
Wuthering Waves FAQ
How many teams does Tower of Adversity need?
A: The deep zone needs three squads of three with no character reused across squads .
How should echo cost be split?
A: Five slots on 4-3-3-1-1 for 12 points total, with survival squads allowed to run 3-3-3-1-1 as a transition.
What crit rate should a carry aim for?
A: 60 percent crit rate and 120 percent crit damage to start, with 120 percent energy regen to keep the rotation going .
How are Tower stars calculated?
A: Stars follow remaining time, so only one of your three squads needs a full build.
Are there new 3.7 characters worth pulling?
A: The full 3.7 banner schedule has not been announced in detail, so check in-game notices and the current convene description before spending.
Wuthering Waves October action list
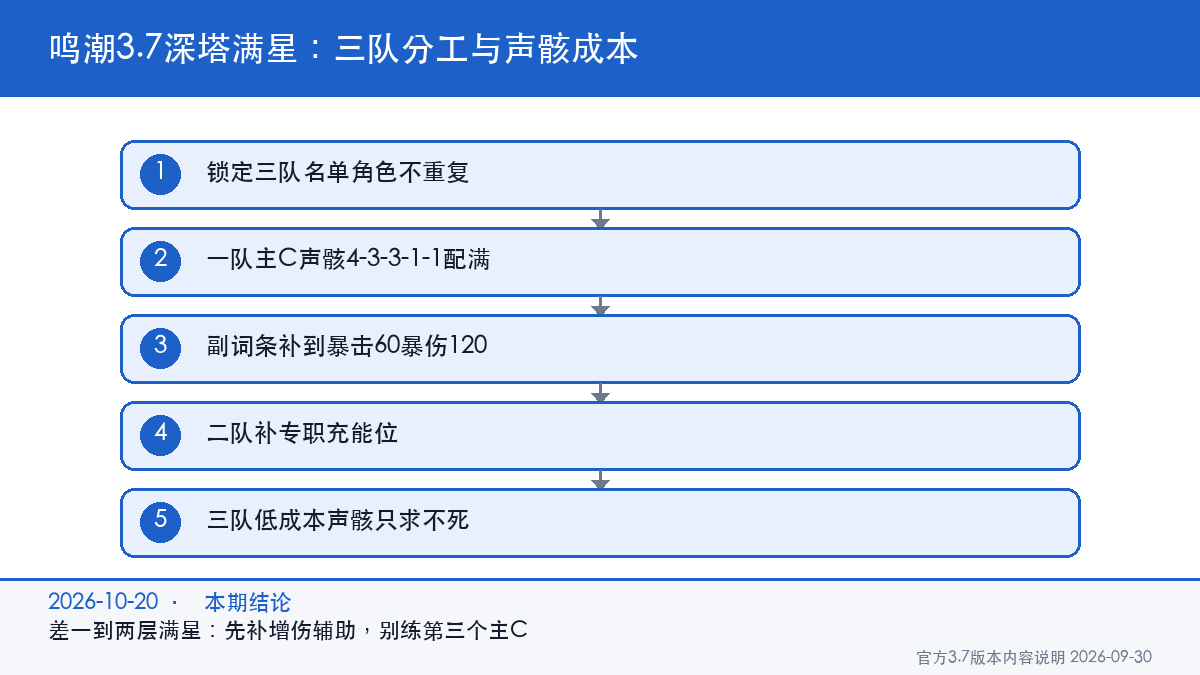
- Lock the three team rosters and confirm no character repeats.
- Build team one's carry echoes on 4-3-3-1-1 and push sub-stats to 60/120.
- Add a dedicated battery to team two so the sub-carry can rotate.
- Keep team three on cheap echoes; survival is the only requirement.
- Spend the daily 240 waveplates on one line, not three.
Comparable Tower and Abyss math for other gacha titles is updated in the guides section on gghubs.com. Later 3.7 banners stay subject to official notices (GameHub).