
the Spiral Abyss resets on November 16. Floor 11 gives the whole party 60% Electro DMG and 60% Geo DMG, floor 12 phase one boosts Lunar-Crystallize damage by 75% in the first half and gives the party 200 Elemental Mastery in the second, and the Moon Blessing "Resonant Zenith" fires a shockwave after three Superconduct or Star-Superconduct triggers (source: official 7.2 update notes, 2026-11-04).
 Applicable version: 7.2 "When Ruin Begins" (live 2026-11-04)
Quick look at this Abyss cycle
| Item | Verdict | Basis |
|---|---|---|
| Floor 11 | Electro +60%, Geo +60%, both usable | Official 7.2 notes |
| Floor 12 first half | Lunar-Crystallize +75%, bring Geo/crystallize | Same |
| Floor 12 second half | Party EM +200, reaction teams gain most | Same |
| Blessing | 3 Superconduct/Star-Superconduct stacks fire a true-damage shockwave | Same |
| Easiest path | Mitya or a built Electro carry, otherwise Geo | Hands-on judgement |
Floor 11: picking between two 60% buffs
Floor 11 reads "all party members gain 60% Electro DMG bonus" and "all party members gain 60% Geo DMG bonus" (source: official 7.2 notes). This is not a choice. It means the floor only rewards Electro and Geo, and every other element starts 60% behind.
How to read the ley line
Both bonuses apply to the character panel and do not conflict. Bring an Electro carry and floor 11 hands you 60% for free. Bring Geo and it is the same. The real losers are mono-Pyro, Hydro, Cryo, Anemo and Dendro teams, which need an extra rotation to full-star.
Team shape
Floor 11 has dense trash, so clear speed matters. Run carry plus sub-DPS plus buffer plus sustain, with the carry on Electro or Geo. Stacking a non-Electro, non-Geo carry here is not recommended because a 60% gap is hard to close with execution on a low-investment account.

Floor 12: two halves, two different logics
Floor 12 splits cleanly: first half boosts Lunar-Crystallize damage by 75%, second half gives the whole party 200 Elemental Mastery (source: official 7.2 notes). You need two different teams, not one that bulldozes both.
First half: who eats the 75%
Lunar-Crystallize is the upgraded crystallize reaction, so the team needs reliable crystal generation. Geo characters are natural picks, plus a sub-DPS who applies elements consistently. The 75% multiplies reaction damage, so EM is worth more than ATK here.
Second half: who can use 200 EM
200 EM is flat and goes straight onto the panel. Vaporize, Melt, Hyperbloom and Aggravate teams feel it immediately. Pure physical or direct-damage teams get almost nothing. It is not "everyone benefits", it is "whoever leans on reactions benefits".
The Moon Blessing: stacking three triggers
This cycle's blessing, "Resonant Zenith", grants one stack whenever a character triggers Superconduct or Star-Superconduct on an enemy. At three stacks it releases a shockwave at the enemy dealing true damage and clears the count. Stacks are capped at one per 0.1 seconds, and a shockwave can fire at most once every 4 seconds (source: official 7.2 notes).
Triggers and internal cooldown
Three things follow. First, only Superconduct or Star-Superconduct counts, plain Electro damage does not. Second, the 0.1-second gate throttles even high-frequency reactions. Third, the 4-second cooldown caps the blessing at roughly one shockwave per 4 seconds.
Why reaction frequency beats raw damage
The blessing rewards trigger count, not Electro DMG%. Mitya lines up perfectly because her kit is built around Star-Superconduct (source: official 7.2 notes). At one shockwave per 4 seconds, a 90-second fight can produce about 20 shockwaves, and that true damage ignores your stats, which is huge for lower-investment accounts.
Three teams you can copy
Team one: Mitya + Valery + buffer + sustain
Mitya is the 7.2 five-star Electro catalyst carry, and Valery is the same-version four-star Electro support who provides Electro buffs and shields (source: official 7.2 notes). Same element, one slot covering buff and shield, and a four-star is easier to max. This is the best value here.
Team two: Geo crystallize for the first half
The 75% Lunar-Crystallize buff is the easiest thing to waste. If you own a built Geo team, send it into the first half and let crystallize carry the reaction damage. The tradeoff is weaker single-target burst.
Team three: no Mitya
Without Mitya or Geo, do not pull for this cycle. Use your existing Electro carry for floor 11's 60%, put a four-star Geo team in floor 12's first half, and your best reaction team in the second. It will not be fast, but it will full-star.
| Team | Composition | Floors | Rotation |
|---|---|---|---|
| One | Mitya + Valery + buffer + sustain | Floor 11 / 12 second half | Valery shield first, buff, then Mitya on field |
| Two | Geo carry + crystallize sub + buffer + sustain | Floor 12 first half | Sub applies element, carry triggers crystallize |
| Three | Existing Electro carry + Geo four-stars + two supports | Floor 11 and 12 split | Swap teams per floor |

Enemies: the notes only say "updated"
The official 7.2 notes say only that floor 11 and 12 enemy lineups were updated (source: official 7.2 notes). No per-floor list. So any guide publishing every floor-12 enemy name today is working from beta leaks or making it up.
Check in game on November 16
When the cycle opens, the Abyss screen shows the lineup. Until then, build for element fit rather than countering a specific boss, which is exactly why the three teams above follow the ley line buffs.
General approach
Whoever the enemies are, this cycle rewards reaction frequency (blessing) and element fit (ley lines). Smooth out your application loop before optimising burst windows.
How many resources does this cycle need
The Abyss costs no resin, but characters do. By common community figures, taking one character from 80 to 90 costs about 172 Hero's Wit and 688,000 Mora, one five-star artifact from +0 to +20 costs about 270,000 Mora, and floors 9 through 12 pay 600 Primogems at full stars (community figures, not official; check in-game values).
Mora and resin budget
Add it up: one level-90 character plus a +20 artifact set runs about 2 million Mora. If you are one character short of full stars, price that before rushing before November 16.
What not to spend on
Pulling a character purely for a 60% ley line buff is the worst trade available. One Abyss cycle pays 600 Primogems; a character costs 90 pulls. The math only works if you wanted the character anyway.
Is it worth building a new character for this cycle
Verdict: no if you already have Electro or Geo
Accounts with a built Electro or Geo carry need nothing new. The 60% is free, and investment level decides the rest.
Single-team accounts
Put resources into characters that can eat both ley lines, for example an Electro carry with a Geo sub-DPS covering two floors with one team. Cheaper than pulling.
No matching element at all
Skip full stars this cycle and take what you can. The Abyss has no leaderboard, and one missing star costs nothing.
FAQ
How much damage do I lose without Electro on floor 11?
A: 60%. The ley line gives the whole party 60% Electro and 60% Geo, so off-element teams trail by that margin all run.
Who can use the 200 EM on floor 12's second half?
A: Reaction teams. It is flat EM, so Vaporize, Melt, Hyperbloom and Aggravate gain most, while physical and direct-damage teams gain almost nothing.
How often can the blessing fire?
A: At most once every 4 seconds. One stack per 0.1 seconds, three stacks to trigger, so roughly 20 shockwaves in a 90-second fight.
What can I prepare before November 16?
A: Two things: max your Electro or Geo carry's level and weapon, and check the enemy lineup on November 16 before locking the halves.
How many Primogems does the Abyss pay?
A: 600 for full stars on floors 9 through 12, at 50 per chamber, and it does not reset within a cycle.
Action list for this week
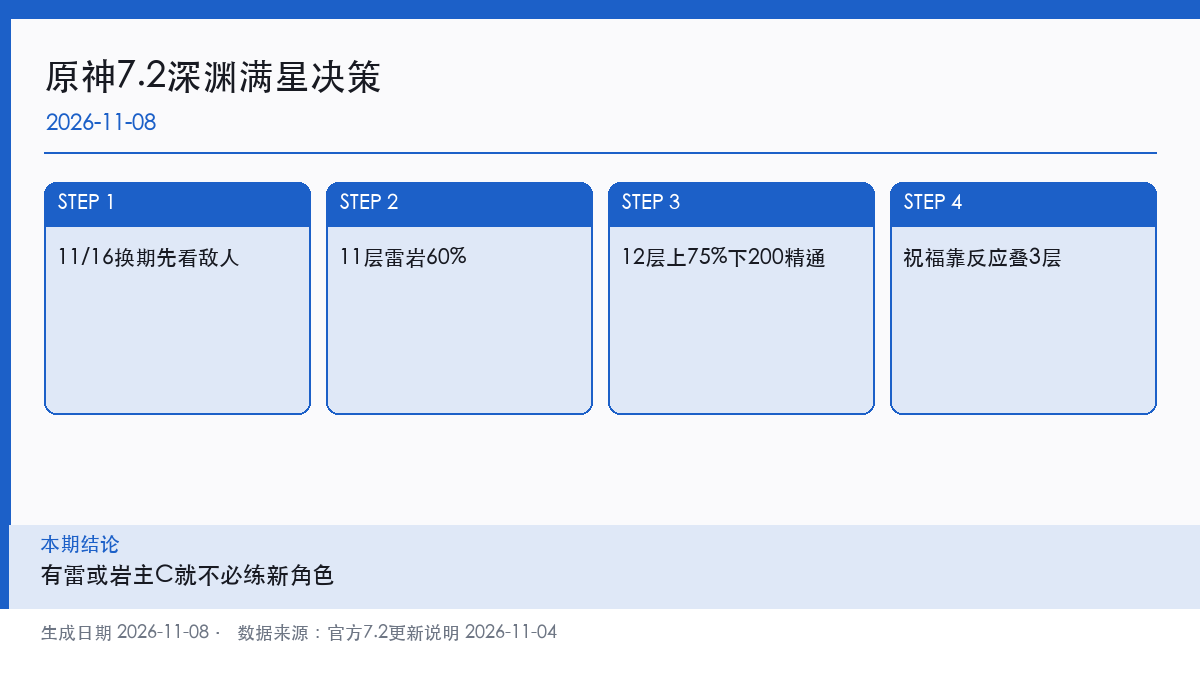
- November 16: when the cycle flips, check floor 11 and 12 lineups before splitting teams.
- Teams: run Mitya + Valery + buffer + sustain if you have her, otherwise split by element.
- Artifacts: fix main stats only. The ley lines already give plenty.
- Budget: 2 million Mora per level-90 character plus a +20 set, so check stock first.
- December 16: the second cycle buffs Cryo and Anemo, so start building those carries.
Post-7.2 Abyss adjustments are tracked on gghubs.com, and GameHub's guide section keeps the team tables updated.