
Here is the breakdown: how COST should be split, who belongs in the main slot, whether the set or the skill wins when they clash, and how far a substat roll has to go to count. Read it through and, while no Wuthering Waves guide site can promise a one-shot perfect build, you should at least skip a few detours.

Wuthering Waves 3.7 Echo Overview: Five Slots and the COST Cap
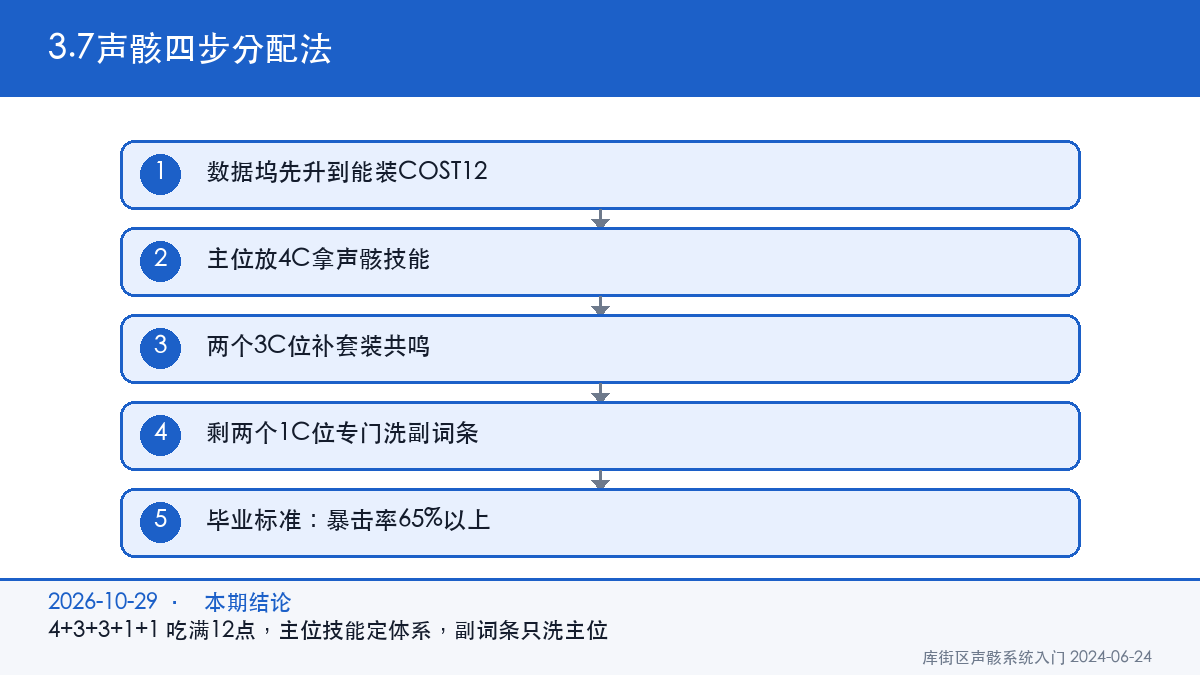
A character has five Echo slots and can wear at most five at once. The first is the main Echo slot, and the Echo Skill you actively cast on the field is tied to it; the other four stay passive and only contribute stats and Sonata effects. Put simply, the main slot casts the skill and the other four prop up your numbers, which holds true for every T0 Wuthering Waves character.
First, clear up a common misconception: COST is not an Echo's level, it is capacity. It describes how much Echo power a character can carry, and it rises with Data Bank level, from 8 points at minimum to 12 when maxed. Think of it as inventory weight: what you can fit depends on the size of the bag, not on how good any single piece is.
Echoes carry their own COST as well: the Calamity and Overlord tiers cost 4, Elites cost 3, and Commons cost 1. The five you wear must add up to no more than the character's cap; go over and they simply will not equip.
One caveat here: until your Data Bank is leveled, you cannot even fill 12 points, and working out a layout before then is wasted effort. There is only one correct order: push the Data Bank until it holds 12, then come back and arrange your slots. Reverse it and no amount of careful math will save you.
Wuthering Waves Echo COST Allocation: Three Ways to Spend All 12 Points

| Combo | COST breakdown | Slots | Best for |
|---|---|---|---|
| Standard | 4+3+3+1+1 = 12 | 5 | Main slot needs a 4-Cost skill; the general best choice |
| Dual high-cost | 4+4+3+1 = 12 | 4 | Highest single-piece stats, but one fewer 1-Cost slot |
| Triple high-cost | 4+4+4 = 12 | 3 | Extreme main-stat stacking; sets are hard to complete |
Most players run the standard layout, and the logic is simple: all five slots are occupied, sets come together most easily, and the main slot naturally carries a 4-Cost skill. The dual high-cost layout looks stronger on paper with its bigger single-piece stats, but it only has four slots, so you are constantly one piece short of a set and stuck there.
So does more 4-Cost always mean better? Not at all. When a set is incomplete, the extra stats from two more 4-Cost pieces cannot make up the shortfall. Sonata effects trigger on piece count, so missing one piece is not a 10% penalty, the whole effect is gone. Trading an entire set bonus for a few points of ATK is a losing deal however you run the numbers.
Wuthering Waves Main Echo: The Skill Defines the Build
The skill on your main Echo is the one the character can actively press in combat. Choosing a main Echo is therefore never about the highest stats, it is about the skill that genuinely fits into your damage rotation.
For a damage dealer, favor a main skill that adds a damage buff or extra hits, so the rotation gains another independent source of damage. For a support, do the opposite: pick a skill that grants the team buffs or resistance shred.
One more thing: move the main Echo and the whole build has to move with it. Swap a damage-buff main Echo for a utility one and your team's entire damage rhythm shifts. That is not a tweak, that is a rebuild. Plenty of players get caught here, believing they only swapped one Echo, then spend ages wondering why the rotation fell apart.
Wuthering Waves Echo Sets: How Sonata Effects Come Together
Sonata effects trigger on piece count, usually at two pieces and at five. Build advice: lock in the main-slot skill first, then fill out the set. Doing it in reverse means fighting yourself, settling on a set only to find the skill does not fit. And the Wuthering Waves character tier list is closely tied to set choice as well.
A 4+3+3+1+1 spread that reaches a full five-piece set means all five slots must come from one set, which pins your main-slot skill down. Most accounts end up with the compromise: the main slot wears whatever piece the build needs, and the remaining slots drift toward the same set. When set and skill genuinely collide, protect the skill. You press it every fight, while the set is only passive stats.
For the sets added in 3.7, take the exact values from the in-game archive. The official notes do not list them one by one, and I will not guess here and mislead anyone.
Wuthering Waves Echo Substats: What to Roll First, and What Counts as Finished
| Priority | Substat | Notes |
|---|---|---|
| 1 | CRIT Rate | Push to 50%+ first |
| 2 | CRIT DMG | Stack once CRIT Rate is settled |
| 3 | ATK% | Universal value |
| 4 | Energy Regen | Add when the rotation stalls |
Set expectations straight first: finished does not mean five gold-tier substats maxed out. The real benchmark is three things: enough CRIT Rate on the main Echo, a completed set, and no dead stats. Everyone would love five perfect pieces, but the cost-effectiveness is frightening, far worse than simply rolling the main Echo properly first.
Once the main Echo has rolled two useful substats, stop and move your resources to the next slot. It works like weapon refinement: the moment marginal returns start falling, you should stop. Better to get all five slots field-ready than to grind one stat line for two weeks and fuss over details afterwards.
Wuthering Waves 3.7 Echo Farming: Where to Spend Your Waveplates
Echoes drop by chance from Tacet Discords, and main Echoes usually require higher-level ones. Farming Echoes therefore means farming Tacet Discords: put your Waveplates into routes dense with them instead of wandering.
Why is the main slot harder to roll than the other four? Because it does two jobs at once: it carries the Echo Skill your character actively casts, and it takes the highest main-stat tier. The other four only supply stats and Sonata effects, so a bad roll just means swapping in another piece. Roll a bad main Echo and your entire damage rotation has to be retuned. That is why resources always go to the main slot first, with the remaining slots filling in the set afterwards.
Prepare yourself for one more thing: Echo drops are probabilistic, not guaranteed. Running the same Tacet Discord a dozen times before the set you want appears is entirely normal. When nothing drops, do not suspect your account, count how many runs you have actually done.
For Waveplate planning, set aside what the Data Bank upgrade will cost, then pour the rest into the Tacet Discords your main Echo needs. The exact number of runs depends on how many Waveplate refills you have saved up; there is no fixed figure. The point is to upgrade the Data Bank first and farm the main slot second.
A word on banners too: the character banner guarantees a 5-star within 80 pulls, and when a 5-star appears there is a 50% chance it is the featured character. Pull the character first, then farm Echoes. Do not do it backwards and end up with a finished Echo set for a character you never pulled. That kind of waste is genuinely painful.
Back to the opening point: to open all five slots on 12 COST, 4+3+3+1+1 really is the only route. It is not superstition, just sequencing. Upgrade the Data Bank, settle the main-slot skill, and only then worry about sets and substats. Get the order right and you save your own time and Waveplates; get it wrong and no amount of farming moves you forward.
Wuthering Waves 3.7 Echo FAQ
What is the most sensible way to allocate COST 12?
4+3+3+1+1, occupying all five slots with a 4-Cost in the main slot. The dual-4-Cost layout has only four slots and is often one piece short of a set.
What level should the Data Bank reach?
High enough to hold 12 points. The COST cap runs from 8 at minimum to 12 at maximum, depending on Data Bank level.
Does the main slot have to be 4-Cost?
Not necessarily. The main slot carries the Echo Skill, so if the skill your build needs sits on a 3-Cost Echo, wear a 3-Cost there and use the two 4-Cost slots to make up stats, though with five slots you will often end up one piece short of a set that way.
Which slot should I roll substats on first?
The main slot. Stop once it has two useful substats and move on to the next slot. Chasing perfection on all five is spectacularly inefficient.
When does the 3.7 second-half banner close?
It closes at 11:59 on November 11. A 5-star is guaranteed within 80 pulls, with a 50% chance of the featured character.
For the T0 characters in the current version, Echo builds basically follow this same template; the only difference is which skill sits in the main slot. The main Echo comes first in the roll order because a bad one forces you to retune the whole rotation, while a bad piece in any of the other four slots just means swapping in a replacement.
Action Checklist
- Raise the Data Bank until it can hold 12 COST.
- Arrange the slots as 4+3+3+1+1, with the skill your build needs in the main slot.
- Stop rolling the main Echo once it has two useful substats.
- When set and skill conflict, keep the skill.
- Decide on the second-half banner before 11:59 on November 11.
All Echo values above follow the in-game archive. I keep long-term build notes in the guide section at gghubs.com if you want to browse.