
You have seen the 3.7.2 patch notes, right? A single line: fixed crashes on some iOS devices. No new characters, no balance changes, and the banner still features the same old faces. What really holds players back this patch is not the gacha — it is how you reroll the substats on the five echoes in your inventory, and how to line up your three teams for the Tower of Adversity. Characters can wait for the next banner, but an echo with wasted rerolls drains your waveplates every single day. Spending your 12 Cost points in the right places does far more for your account than pulling one more character. This guide covers exactly two things: Wuthering Wavesecho rerolling without wasting resources, and how to arrange your three Tower teams.

Wuthering Waves 3.7 Echo Loadouts: How to Spend Your 12 Cost Points
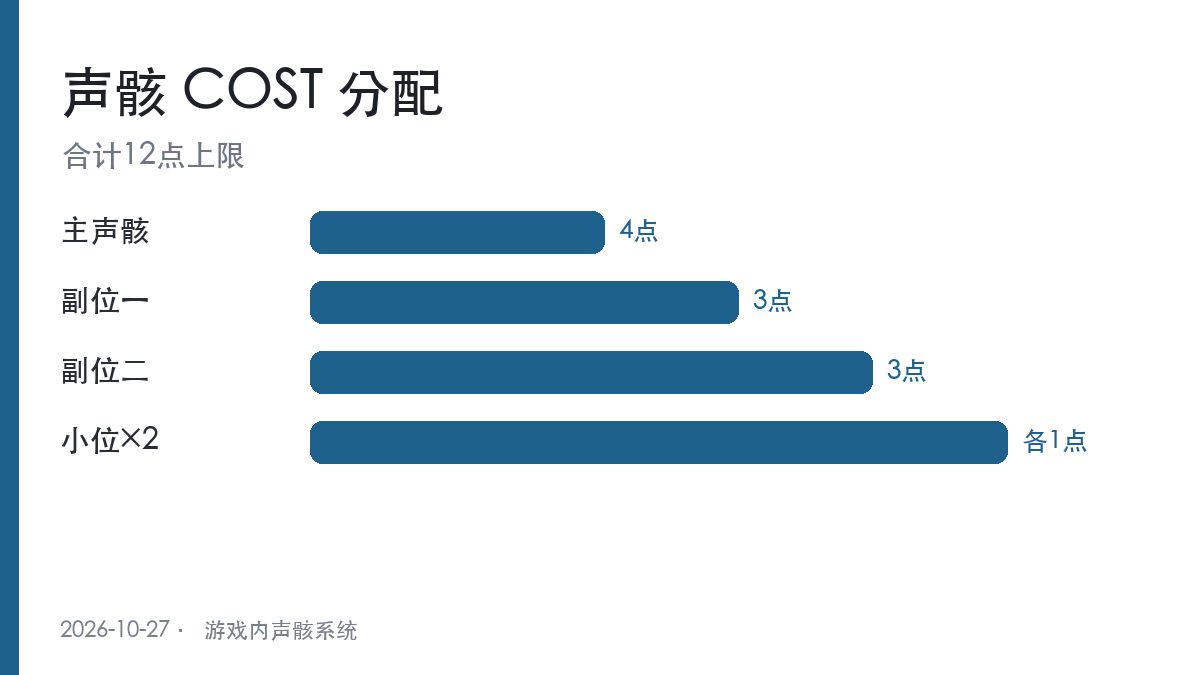
Echoes occupy five slots under a 12-Cost cap, and the mainstream split is 4+3+3+1+1: one 4-Cost main echo, two 3-Cost echoes, and two 1-Cost echoes. The logic holds up. The 4-Cost main echo rolls the highest main-stat values, while each 1-Cost slot gains one extra substat line, so every slot pulls its weight — that is what it means to spend all 12 Cost points well.
What about 4+4+4? Three 4-Cost echoes hit exactly 12, which looks maxed out on paper but actually loses value. First, you give up the extra substat lines from the two 1-Cost slots; second, 4-Cost echoes have a narrower main-stat pool than 3-Cost ones. In practice, 4+3+3+1+1 yields more total substats and more room for error. It also lets you reroll the four non-main echoes separately, so one ruined piece never forces a full reset. Anyone who has rerolled echoes knows how discouraging it is to start over from zero.
Start with the main echo: its main stat directly determines the damage profile of the whole build. Whether the set bonus activates and which main stat you get both hinge on this single piece, making it the only slot worth maxing out ahead of everything else. For DPS characters, prioritize 4-Cost echoes with a CRIT Rate or CRIT DMG main stat; supports and healers should go for HP% or ATK%. Wuthering Waves T0 characters are few and far between, so fit matters most — the main stat has to match the character's role. Putting an HP main stat on an attack-oriented character is a complete waste.
With the Cost split settled, let us move on to substats — the biggest resource drain of all.

Wuthering Waves 3.7 Substats: Priority Order and Reroll Cost
Substats are, without question, the biggest resource sink in the entire echo system. Each echo can hold up to five substats, and rerolling replaces them at random. So decide on your priorities before you start — changing your mind halfway through only burns resources for nothing.
DPS and Supports: Two Completely Different Priority Orders
Substat priority for DPS characters: CRIT Rate = CRIT DMG > ATK% > Elemental DMG > Energy Regen. CRIT Rate and CRIT DMG must be stacked as a pair — stack only one and the other drags your damage down. At 50% CRIT Rate, 10% CRIT DMG delivers just 5% expected value, so no matter how good your CRIT DMG looks on the stats screen, your damage will never take off without enough CRIT Rate.
Supports and healers follow a different order: Energy Regen > HP% > ATK% > DEF%. Supports revolve around their burst rotation — without enough Energy Regen you cannot even fire your burst, and no other substat can compensate for that.
When to Stop Rerolling
The rule of thumb: stop at two useful substats and move your resources to the next piece. Chasing three useful substats multiplies the cost several times over, and full-starring the Tower does not require every echo to be perfect. Resources are finite, so spend them deliberately. If all three teams have two useful substats across their sets, the Tower is already within reach; pouring everything into one perfect echo leaves your other team permanently one step short. Trading your whole team's stars for a single echo is never worth it.
Done Rerolling? Do Not Waste EXP Either
Leveling echoes consumes EXP materials, and the order matters: max out the main echo first, then the two 3-Cost pieces, and save the two 1-Cost pieces for last. The 1-Cost slots have low substat ceilings to begin with, so maxing them pays off far less than getting your main echo right.
This is why so many accounts show inflated Combat Power: everything maxed out, yet every main stat and substat is junk. Nice-looking numbers will not save you — you will still get beaten down in the Tower. That wraps up the echo section; next, how to arrange your three Tower of Adversity teams.

Wuthering Waves 3.7 Tower of Adversity: Splitting Your Three Teams
The Tower of Adversity requires rotating multiple teams, with the exact number of floors and teams set by the current season rules. The core idea is simple: send your strong teams to the high floors and your weak teams to the low ones. Do not force your main team onto every floor.
How to Assign Your Three Teams
Team 1 is your main DPS core, built for the hardest floor. Team 2 pairs a sub-DPS with a healer for the mid-difficulty floors. Team 3 is everyone else cobbled together — as long as they survive, they will score points.
Do not forget one hard requirement: all three teams must meet the Energy Regen threshold. Otherwise your rotation falls apart halfway through, which is deadlier than lacking damage — low damage only makes fights slower, while a broken rotation grinds everything to a halt.
How to Read the Current-Season Buffs
Each Tower season comes with environmental buffs; the in-game interface is the definitive source, since official announcements rarely list them one by one. Read the buff descriptions before you enter and decide which team takes which floor: if the buff is elemental DMG, field the team matching that element; if it is an Energy Regen buff, field the team whose rotation is tightest.
With the very same teams, simply changing the order can be the difference between one star and full stars. It is the cheapest way to gain points — no reason not to use it.

Common Mistakes
The three most common traps: sharing one echo set across all three teams and only noticing after you have entered; bringing a single healer and running dry by the second floor; and burning your main DPS on the first floor, leaving the last two floors to a crippled roster. Assign your teams properly and all three traps disappear — avoid them, and you are already ahead of most players.
What Actually Determines Your Score
The Tower of Adversity scores floor by floor, judging clear time and survival on each one — simply clearing is not enough. Faster clears and less damage taken mean a higher score.
That is why Teams 2 and 3 are not valued for their damage output, but for whether they can clear a floor on their own without falling apart. That is what decides whether you full-star or stay one star short forever.

Wuthering Waves 3.7 Resource Planning: Who to Build First
3.7.2 brings no new characters, so pour your resources into the core units you already have. Rank your priorities by one question: "does this help me clear one more Tower floor?" Do not rank by character hype — hype belongs to everyone else, but the floors you clear are yours alone.
Priority Table
| Priority | Target | Reason |
|---|---|---|
| 1 | Main DPS Echo substats | Directly raises damage on every floor |
| 2 | Energy Regeneration on Team 2 healer | Decides whether Team 2 can clear a floor solo |
| 3 | Sub-DPS level and skills | Supplementary damage, limited payoff |
| 4 | New characters | None this patch |
How to Spend Waveplates
Alternate between the echo dungeon and the skill-material dungeon — do not dump all your waveplates into echoes. Once an echo rolls one useful substat, stop; spend the remaining waveplates on skill levels. Skill levels are a guaranteed return, while rerolling echoes is a gamble: one is reliable, the other is pure RNG. Which to prioritize goes without saying.
Echoes, the Tower, resources — all three topics covered. There are no new characters to wait for this patch, so everything comes down to the veterans already in your hands. Get your Cost split right, get enough useful substat rolls, and spread your teams properly, and the Tower stars will follow. Logging in and putting this into practice beats reading ten guides.
Wuthering Waves 3.7 FAQ
What changed in 3.7.2?
It only fixed crashes on some iOS devices — no new characters, no new echoes, and no balance adjustments.
What is the echo Cost cap?
12 Cost across five slots, with 4+3+3+1+1 as the standard split, keeping the two 1-Cost slots for extra substats.
How many substats should you stop at?
Stop at two useful substats. Chasing a third doubles the cost, and full-starring the Tower does not require maxed substats everywhere.
How many teams does the Tower of Adversity need?
Multiple teams rotate under the current season rules, but preparing three is enough: a main DPS team, a sub-DPS plus healer team, and a filler team. All three must meet the Energy Regen threshold.
Is it worth pulling for new characters in 3.7?
3.7.2 has no new characters — the banners are all returning units. Pull only if you are missing that specific role.
Action Checklist
- Check that your five echoes total exactly 12 Cost — no more, no less.
- Reroll your main echo main stat to CRIT Rate or CRIT DMG; never run an HP main stat on a DPS character.
- Stop rerolling once an echo has two useful substats, then move to the next piece.
- Split your three Tower teams: main team for the high floors, weaker teams for the low floors.
- Check the current-season buffs before entering, and reorder your teams by element or Energy Regen. Long-run echo data and tower lineups are collected in the GameHub Wuthering Waves section.