| Battlefield | Barrier-breaking method | Recommended team | Key numbers |
|---|---|---|---|
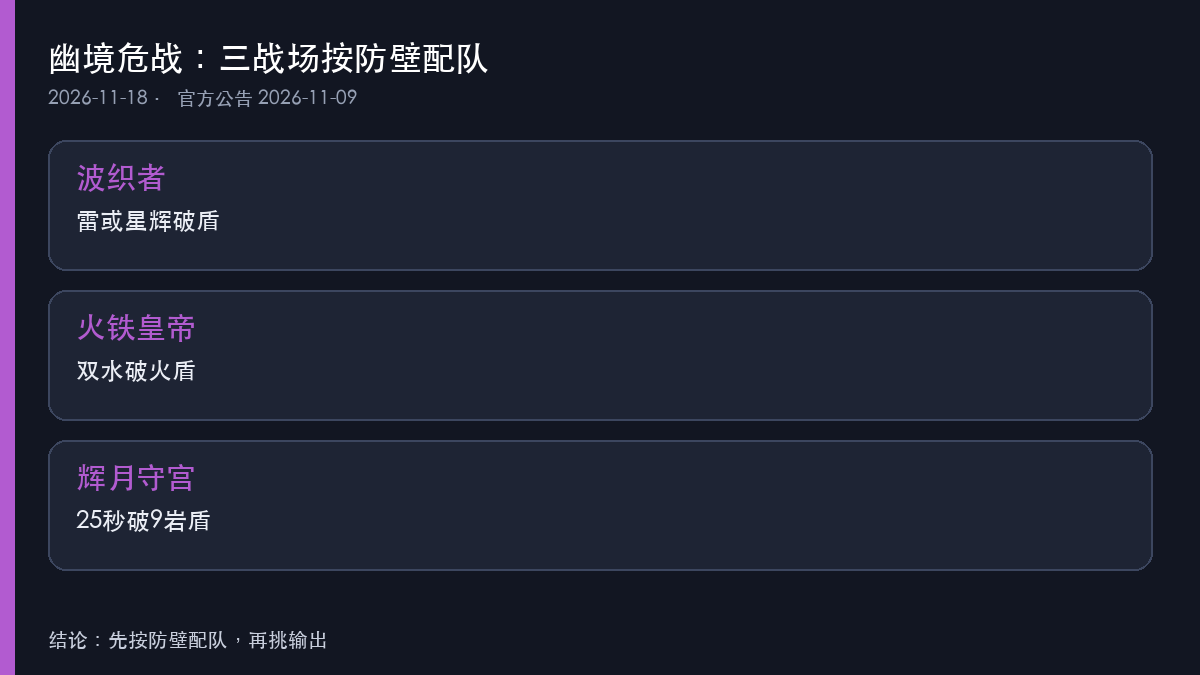
| Wavebinder | Electro / Stellarium·Conduct reaction | Mitya + Odette + Yae Miko + Valeriy | Non-Stellarium teams get the shield out in about 10 seconds, Stellarium teams in about 30 seconds |
| Emperor of Fire and Iron | Double Hydro breaks the fire shield | Skirk + Escoffier + Furina + Vodyanitsa | Crab ram on the boss deals 60% Hydro damage conversion, capped at 15% HP |
| Radiant Moongecko | Geo / Lunar Crystallize / Overload / claymore | Zibai + Linnea + Columbina + Illuga | 9 Geo shields, all broken within 25 seconds |
(Mechanics and numbers source: official 7.2 version update notes plus hands-on testing from guides of the same period. New character names follow the international server spelling; simplified Chinese names follow the official announcement.)
Fearless Challenge is the hardest endgame mode in Genshin right now. Fearless and Dire share the exact same mechanics. The only difference is HP and level (Dire opponents are level 110, and some buffs are disabled). In other words: if you can clear Fearless, you already know Dire at the mechanics level. All that's left is your build quality. This guide lays out the clear conditions, shield-break windows, and team-building reasoning for all three battlefields, one by one.
Building around mechanics is more reliable than copying teams from a Genshin character tier list. That's especially true this cycle.
Applicable version: 7.2 "When Ruin Begins" (live 2026-11-04)
Genshin Impact 7.2 Imaginarium Theater Battlefield 1: Wavebinder's Shield and Courage Gauge
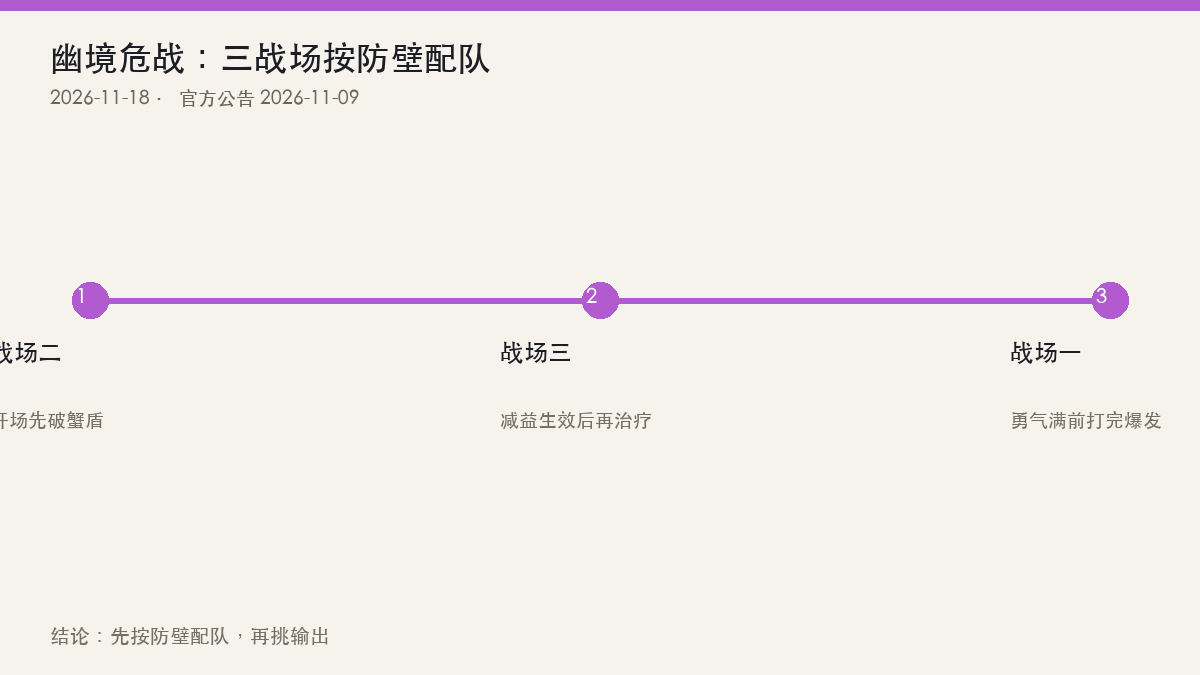
When the shield comes out depends on whether you bring Electro
Wavebinder is the new BOSS this rotation. Its weakness is the Electro and Stellar Glimmer reaction, and Stellar Glimmer Conduction (星辉·导) gets the most out of it. When its shield shows up depends directly on your team comp (Source: Insider Gaming testing):
- Non-Stellar Glimmer team: about 10 seconds into the fight, the BOSS drinks water and the shield comes out
- Stellar Glimmer team: the first Stellar Glimmer reaction interrupts it, and the shield is delayed to about 30 seconds
- Triple Electro or high Electro application team: a chance to skip the second shield entirely, and you won't see it until about 50 seconds
Shield break speed works the same way: bring one Electro support (Fischl, for example) and you break it in about 20 seconds. Raw damage brute-forcing takes around 40 seconds. Stellar Glimmer Conduction teams are faster. In a twenty-minute fight, that 20-second gap is the line between clearing and not clearing.
A full Courage gauge makes it stronger
This fight also has a "Courage" meter that fills over time. Once it's full, the BOSS enters an empowered state with higher resistance (Source: GamingonPhone mechanics breakdown). So the right rhythm isn't "wait for the shield, then hit it." It's break the shield and use your burst window before Courage fills. For positioning, hug its tail to dodge most of the frontal attacks.
This isn't a "just bring one Electro" fight
A lot of people slot in one Electro character, figure they're safe, and the shield still breaks slowly. Shield breaking is about Electro application frequency and how often the Stellar Glimmer reaction triggers, not whether Electro is on the team at all. A single low-frequency Electro team still takes close to 40 seconds to break the shield. Either run double Electro, or run a Stellar Glimmer Conduction team (Mitiya's Electro damage is calculated as Stellar Glimmer damage). That's the real answer for this fight.
Genshin Impact 7.2 Labyrinth Warriors Battlefield 2: Emperor of Fire and Iron and the Three Crabs
Fire shield stats and how to break it
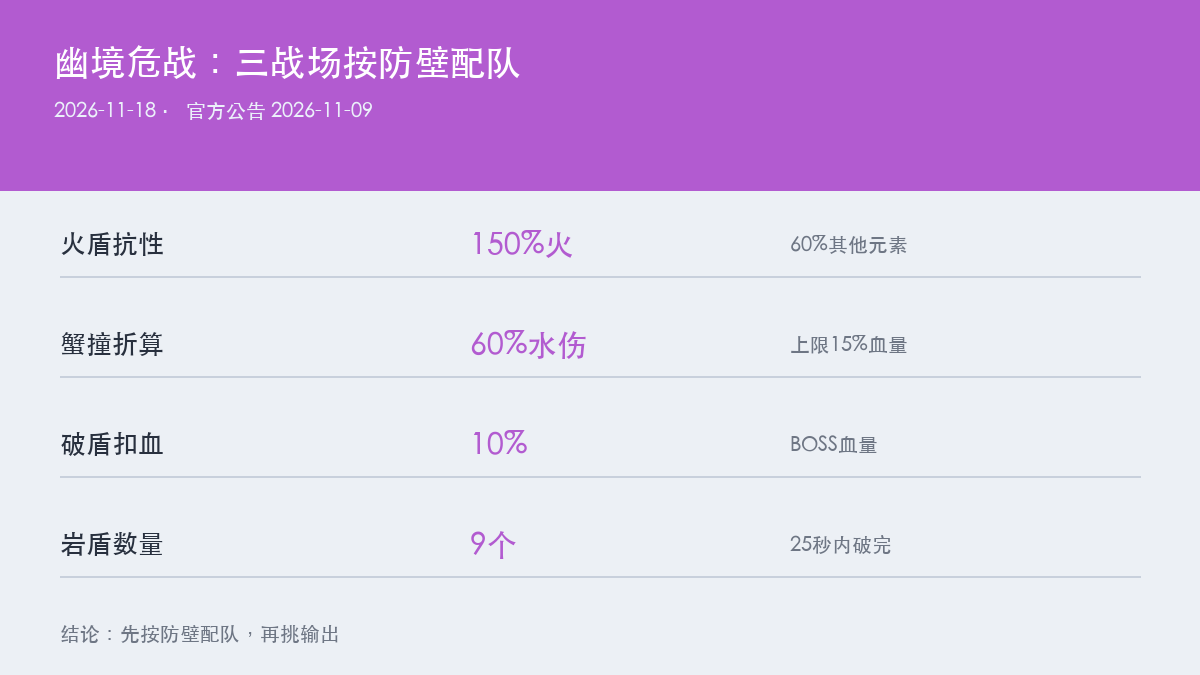
The Emperor of Fire and Iron comes from Fontaine. It opens the fight by raising a fire shield and summoning 3 Sternshield Crabs, each of which also carries a fire shield. The shields have 150% Pyro RES and 60% RES to other elements (Source: GamingonPhone mechanics table). So this fight isn't about who has the bigger damage numbers. It's about who can keep applying Hydro.
How crab collisions against the BOSS are calculated
Once you break a crab's fire shield, the crab goes out of control and slams into the BOSS, dealing damage equal to "60% of Hydro damage taken + 10% of other damage," capped at 15% of the BOSS's HP. Breaking the BOSS's own fire shield, meanwhile, directly removes 10% of its HP (Source: same as above). That rule decides your approach: clearing the crabs isn't just about clearing the field. The crabs themselves are a damage source, so don't save them for last.
Three ways to build a double Hydro team
- Skirk + Escoffier + Furina + Vodyanitsa: strong off-field Hydro and Cryo application, the most reliable shield-breaking, then follow up with Skirk's burst
- Neuvillette + Furina + Xilonen + Kazuha: Neuvillette's AoE Hydro damage can strip the shields off both the BOSS and the crabs at once. Watch out for the jump slam. If your charged attack gets interrupted, it's wasted
- Mualani + Mona + Xilonen + Sucrose: single-target focused, but with steady Hydro application. Focus on the BOSS and its shield
(Team source: Sportskeeda and games.gg's 7.2 Labyrinth Warriors writeups, both labeled as recommended setups rather than guaranteed clears)

Genshin Impact 7.2 Unnatural Hazard Battlefield 3: Radiant Moongecko's 25 Seconds and Full-HP Crits
9 Geo shields, 25 seconds
Radiant Moongecko starts by creating a Geo construct in the center of the arena, then runs out of range while spreading 9 small Geo shields. You have to break all of them within 25 seconds (Source: GamingonPhone). The fastest tools, in order: Lunar-Crystallize, Geo, Overload, claymores. Once the shields are down, the construct deals a knockback hit to the BOSS based on the damage you dealt, with a bonus for Geo damage.
That "no crits unless full HP" debuff
After you break the shields, the BOSS puts a debuff on you: characters who aren't at full HP can't deal crit damage (Source: Insider Gaming). This is the real difficulty of this fight. Plenty of people break the shields fast, then land zero crits during the debuff window and waste all their time. The correct order: wait for it to apply the debuff, then max out healing to clear it, then open your burst. Don't burn your heals at the start.
Three teams that work
- Zibai + Linnea + Columbina + Illuga: Linnea covers both healing and sub-DPS, Lunar-Crystallize breaks shields fastest, currently the most stable setup
- Mavuika + Ororon + Iansan + Chevreuse: Mavuika breaks shields at the start, then you run your normal rotation and stay at full HP the whole time
- Navia + Ineffa + Columbina + Xilonen: Navia's damage gets converted to Lunar-Crystallize, so she breaks shields and deals damage at the same time, with Xilonen's burst keeping you at full HP
(Team source: compiled from the same two sites)

How Many Resources Do You Need to Prep for Genshin Impact 7.2's Labyrinth Warriors?
Base investment for characters and weapons
The three recommended battlefield lineups use 12 different characters in total (Source: games.gg's 7.2 lineup chart). Going by the passing bar of "every character at level 80 plus key talents at level 8," one character eats roughly 400 Hero's Wit and the matching materials. That's not something you can farm up in a week. The practical approach: start with the battlefield where you already have well-built characters, and fill in the missing one next cycle.
What this banner cycle gives you
The first half of 7.2 features the "Epitome Invocation" banner with Mitea (Electro) and the "Hymn of the Pearl" banner with Furina (Hydro). The weapon banner "Epitome Invocation" offers the catalyst Secret Star Oracle and the sword Still Waters Run Deep (Source: official wish announcement, 2026-11-02 12:00). These two characters happen to cover battlefield one's Electro and battlefield two's Hydro. If you want to clear all three battlefields in one go, this banner cycle is one of the best value picks of the whole year.
Is Genshin Impact 7.2's Lethal Combat Mode Worth Doing?
Verdict: worth pushing to the tier that gets you all the Primogems. Not worth pulling characters just for Dire.
- You can clear Fearless and your roster is average: take the normal rewards and go. Dire only gives symbolic extras, so it's low value.
- Can't get past Battlefield 1: build up Electro or the Stellaron Guide team first. This is the most reaction-specific of the three.
- Can't get past Battlefield 3: check your healing slot and shield-breaking tools. Most people are missing a claymore/Geo, not underleveled.
Genshin Impact 7.2 Unreconciled Stars Common Questions
When does Unreconciled Stars end?
A: This event's announcement was published on 2026-11-09. The season cycle follows the official page. The usual approach is to finish it in the second half of the version (before mid-December), since it changes periods across versions. For the exact end time, check the in-game event page.
Do you absolutely need Electro for the Wave Weaver?
A: Not absolutely, but it's very hard without it. For non-Starglow teams the shield comes out in about 10 seconds, and brute-forcing it with pure damage takes about 40 seconds. With an Electro support like Fischl you can cut it to about 20 seconds, and the Starglow·Guide team is even faster.
Should you clear the Fire Iron Emperor's crabs first?
A: Yes. After you break the crab's Pyro shield, it slams into the BOSS and deals damage equal to 60% Hydro DMG conversion, capped at 15% HP. That's free damage.
Why does the Gloomy Moon Geovishap need to be at full HP?
A: After the shield breaks, the BOSS applies a debuff: "can't crit unless at full HP." Save your healing until after the debuff kicks in, then top up the whole team so you can land crits.
What's the difference between Dire and Fearless?
A: The mechanics are the same. In Dire the opponents are level 110, have more HP, and some buffs are disabled. What it tests is your build and rotation precision, not new mechanics.
Genshin Impact 7.2 Stygian Onslaught Official Source Comparison Table
| Announcement version | Date | Source | Quoted values |
|---|---|---|---|
| 7.2 Version Update Details | 2026-11-04 | Official announcement (hk4e announcement API) | Version "When Ruin Begins" launch time 07:00 |
| "Stygian Onslaught" Event Announcement | 2026-11-09 | Official event announcement | Disordered Ley Line challenge start time 12:00 |
| Wish Announcement | 2026-11-02 | Official wish announcement | Mitiya (Electro), Furina (Hydro) rate UP; weapons Secret Star Oracle and Still Water's Surging Brilliance |
| Three-battlefield mechanics | 2026-11 | Insider Gaming, games.gg, GamingonPhone (tier-3 secondary) | Pyro shield 150% Pyro RES/60% other RES; crab collision counts as 60% Hydro DMG, capped at 15%; 9 Geo shields 25 seconds; shields appear at 10/30/50 seconds |
Action checklist
- First check whether you have high-frequency Electro application. If not, do battlefield two and three first.
- At the start of battlefield two, break the crab shields first and let them ram the BOSS.
- On battlefield three, save your healing until after the debuff kicks in. Don't heal at the start.
- Only try Dire after you can clear Fearless consistently.
- If you want to fill out your roster, go for the Mitiya and Furina banners in the first half of November. Pull on the weapon banner as needed, but don't hard-pity for Dire.
 Everything here was checked against the official announcements on 2026-11-18; updates land on gghubs.com.