
The schedule and strategy for the 3.3 Shiyu Defense in Zenless Zone Zero are basically clear now. The core of this season really comes down to one thing: the first four lines and the fifth line use two completely different rulesets. The first four lines have a time limit, and clearing them early within that window earns bonus rewards; the fifth line is score-based, with a higher score multiplier during the opening stretch.
The 3.3 Phase 2 banner runs from November 11 to December 1, 2026, and features the new Wind-attribute Attack character Severian alongside the rerun Norma. Severian's exact skill numbers have not been released by the official side yet, so this guide does not fill in numbers for them; anything not yet announced is marked as such.

1. The Three Node Types in Shiyu Defense: Stable, Dispute, and Mutation
Stable and Dispute are entry-level; Mutation is the weekly focus
Shiyu Defense is split into three parts: Stable nodes, Dispute nodes, and Mutation nodes. Stable nodes unlock progressively as combat advances; Dispute and Mutation nodes sit at a higher difficulty tier, and Mutation nodes refresh their stage content and rewards periodically.
It is worth noting that these three node types are not "three difficulty settings of the same stage" — they are three separate stage pools. Stable and Dispute lean toward one-time progression, while Mutation nodes are the part you clear repeatedly each week.
Mutation nodes are broken into lines, five in total
The Mutation node structure is "lines." The first through fourth lines each have a combat time limit, while the fifth line switches to a score system. This difference is what determines your team-building logic: the first four lines care about "clearing within the time limit," and the fifth line cares about "how much damage and how many kills you rack up inside the multiplier window."
A dropped rating is not a lack of damage — it is running out of time
The rating tiers for the first four lines are B, A, and S, and the fifth line adds one more tier, S+. Failing to clear within the time limit means an outright failure, and clearing slowly only drops your rating — so the top priority for the first four lines is clear speed and break efficiency, not the peak of a single burst.
2. Line Effects: Read the Buff Before You Build a Team
Every line has its own effect
The gameplay page states that "various line effects will exist during combat, and each line has a special effect." What this actually means is that the same team can perform a full rating tier differently across different lines. Reading the current line's effect description before you start is far more useful than copying last season's team.
The buff's bias toward a role decides who gets fielded
Line effects usually lean toward a certain role or a certain attribute damage type. The specific buffs for this season's Mutation nodes have not been listed one by one in the official announcement; they are written in the in-game line interface — this part can only be confirmed in-game, and any "this season's buff is XX" claim given ahead of time does not count.
This is not "higher combat power means less hassle" — it is "the more accurate your role matchup, the less hassle"
A lot of Proxies rush in with their three highest-power characters and get countered by the line effect. The correct approach is to first check which role the effect leans toward, then field the corresponding characters. In the 3.3 T0 list, the Attack slot is Claret, Severian, Sigrid, Ye Shunguang; the Anomaly slot is Phoenix, Remielle, Velina; and the Support slot is Dialyn, Lucia, Nangong Yu, Norma, Roxy, Sunna, Yuzuha. This list is a basis for "who is worth building," not "who you must field."
3. Team Split: How Six Agents Become Two Teams
One team for break-burst, one team for sustained output
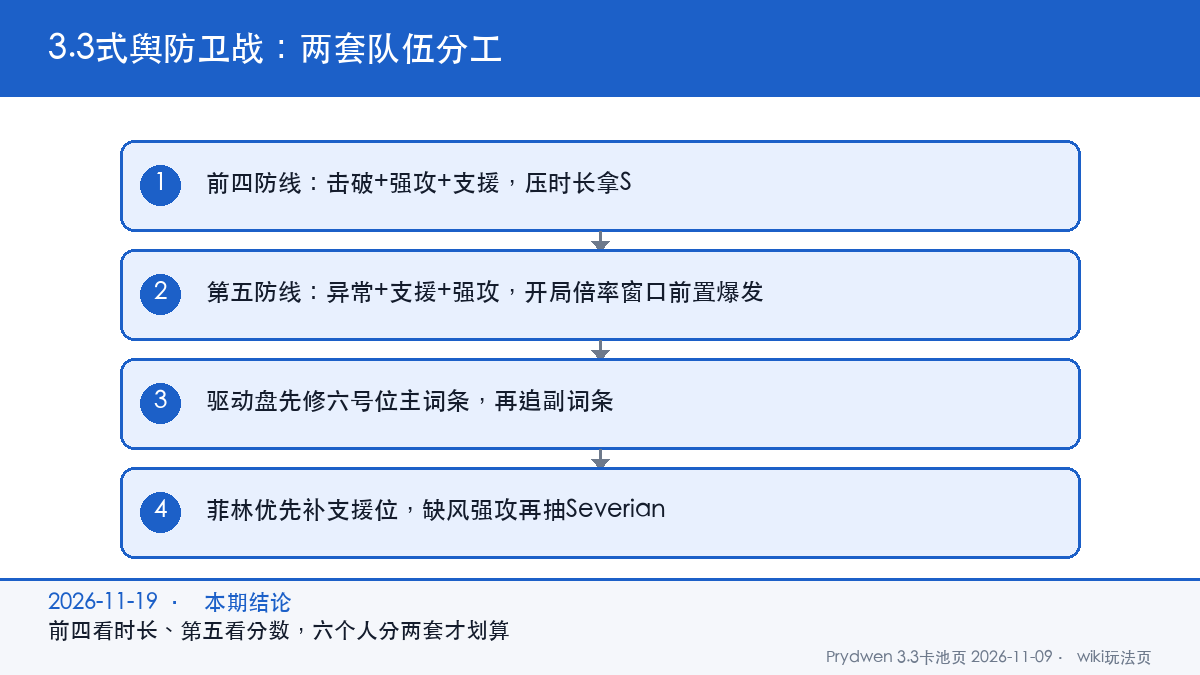
The standard split is: one "Break + Attack + Support" team for the first four lines, clearing fast through burst inside the break window; and another "Anomaly + Support + Attack" team for the fifth line, stacking total score through sustained Anomaly damage inside the multiplier window. Sharing the Support slot between the two teams is normal, which is why the Support slot's build priority is often higher than a second Attack unit.
The Support slot is worth more investment than a second main carry
The reason a single team is not recommended to clear all five lines is that the first four care about time and the fifth cares about score — the same build cannot be optimal for both at once. The reasoning is practical: the Support slot works in both teams, while a second main carry only appears in one. In 3.3 there are seven Support T0s (Dialyn, Lucia, Nangong Yu, Norma, Roxy, Sunna, Yuzuha), so the options are wide; getting one to a usable state beats raising two to a half-finished state.
Drive discs by slot: do not mix up the 4+2 structure
Drive discs use six slots with a 4-piece set plus a 2-piece set structure. The main-stat slot restrictions are fixed: slot four rolls crit rate or crit damage, slot five rolls attribute damage or ATK, and slot six rolls impact, anomaly mastery, or energy auto-regen. For the Attack slot, slot four prioritizes crit rate and slot six prioritizes impact; for the Anomaly slot, slot six switches to anomaly mastery; for the Support slot, slot six looks at energy auto-regen.
Severian's positioning and the unknowns
Severian is a Wind-attribute Attack unit, and in 3.3 Phase 2 he shares a banner with his signature W-Engine Incarcerating Grip. His skill multipliers, core passive, and mindscape effects have not yet been fully released by the official side, and third-party data sites still mark his page as "skills aren't available yet" — so for now all we can say is his positioning (Wind · Attack · T0 potential). We cannot give stat thresholds; everything is subject to the official announcement.

4. How the Fifth Line Is Scored: The Multiplier Window Is the Core
Score comes from damage and kills
The fifth line's rule is that "you gain points when you deal damage to enemies or defeat them," and that "for a certain period after the challenge starts, the score multiplier is higher." Translated into player terms: the opening stretch is the golden window, and the same damage converts to more points during that time.
So the fifth line needs front-loaded burst
The first four lines can be ground out slowly, but the fifth line cannot. In team-building, you should concentrate your burst skills, ultimates, and chain attacks into the opening multiplier window rather than saving them for a late finisher. This is also why Anomaly teams actually suit the fifth line — sustained Anomaly damage inside the window is more consistent and does not wait for one big ultimate.
Total score tiers give the reward, not the rating itself
The fifth line's reward condition is "reaching a combat rating of B, A, S, or S+," and the rating is decided by total score. This means the key to S+ is not "clearing," but "filling the multiplier window." If you do not max out the first wave, the efficiency of later damage fallback drops noticeably.
5. Resource Planning: How to Spend Polychromes and Drive Discs
Build the Support slot first, then consider a second Attack
By the team-split logic above, the Support slot is the shared piece between both teams. When Polychromes are limited, prioritize getting your existing Support slot's drive discs to a usable state before considering pulling a second Attack unit.
Drive disc farming: main stat first, sub stats later
The correct order for farming drive discs is "slot + correct main stat" → "correct 4+2 set" → "correct sub stats." Doing it backward and chasing sub stats first produces "beautiful sub stats but the wrong main stat slot" dead discs. Sub-stat priority: for the Attack slot, get crit rate past the baseline before discussing crit damage; for the Anomaly slot, stack anomaly mastery first.
Should you pull on the 3.3 Phase 2 banner?
For an account lacking a Wind-attribute Attack unit but already having a built break slot, pulling Severian fills the gap; for an account whose main carry is already maxed but whose Support slot is lacking, saving Polychromes for the Support slot is worth more. Norma is a rerun, only worth considering if you lack a Fire-attribute break unit.

6. FAQ
Q: Why can't I score S+ on the fifth line?
A: The fifth line is score-based, and the score multiplier is higher for a period after the challenge starts. Failing S+ is usually because your burst was held until after the multiplier window, not because your build is insufficient; try front-loading your ultimates and chain attacks into the first 30 seconds.
Q: What happens if I exceed the time limit on the first four lines?
A: The first four lines have a combat time limit; exceeding it means the challenge fails this run (all lines except the fifth Mutation line have a time limit), and clearing within the limit is the only way to earn the bonus rewards.
Q: Can one team clear all five lines?
A: Not worth it. The first four care about time and the fifth cares about score — different criteria. For the first four, use Break + Attack + Support; for the fifth, use Anomaly + Support + Attack, with the two teams sharing the Support slot.
Q: Is Severian worth pulling?
A: Pull if you lack a Wind-attribute Attack unit; in 3.3 Phase 2 he shares a banner with his signature W-Engine Incarcerating Grip. His full skill data is not yet officially released, so no stat thresholds can be given now; follow the official announcement.
Q: Which drive disc slot should I farm first?
A: Slot six. Slot six decides your role — the Attack slot wants impact, the Anomaly slot wants anomaly mastery, and the Support slot wants energy auto-regen; one wrong slot six and the whole set is wasted.
7. Upcoming Preparation
For the near term, Proxies are advised to do the following first:
- Read the current line effect before starting, and pick your role based on its bias instead of copying last season's team.
- Use "Break + Attack + Support" for the first four lines, aiming to keep time down for an S.
- Switch to "Anomaly + Support + Attack" for the fifth line, front-loading ultimates and chain attacks into the multiplier window.
- Fix slot six's main stat first on drive discs, then slot four and five, and only chase sub stats last.
- Prioritize Support-slot build with your Polychromes; consider Severian only if you lack a Wind Attack unit, and Norma only if you lack a Fire break unit.
 Data verified as of 2026-11-19; the specific buffs for the 3.3 Mutation nodes are subject to the in-game line interface, and any later announcement updates will be reflected in the guide section of gghubs.com.