
After the 1.0 release, tower and slab boss health went up a notch, so the glass-cannon one-shot approach aged badly. The wheelchair build that just refuses to die is now the safest route. This guide covers team structure, traits, gear, consumables, and how tower and slab fights differ.
Applicable version: v1.0.5 (2026-09-15; source: official Palworld announcement v1.0.5)
Version facts come from the Steam Community Announcements channel; combat findings come from the community field notes cited above, and the palworld breeding traits angle is indexed in GameHub's Palworld section.

Palworld tower bosses versus slab bosses
The two boss types are built differently and should not be fought the same way. Tower bosses are fixed-arena, single-phase fights; slab bosses are summoned multi-phase fights that are extremely sensitive to element counters .
Tower fights are a Pal grind
The core is that the player does not fight: Pals rotate in, hit a rotation, and swap out while you buff from the backline with the enhanced gun and keep everyone alive with potions (source: same).
Slab bosses demand counters
Slab bosses become dramatically harder without element counters, and the Pal army alone will not carry it (source: same). You need to swap the two flex slots per boss, not run one universal team.
v1.0.5 did not touch combat numbers
v1.0.5 is a bug-fix build that addresses terrain and building textures loading at visibly reduced resolution for some players (source: official v1.0.5 announcement, 2026-09-15). Builds worked out after 1.0.4 remain valid in 1.0.5.
Palworld team structure: three fixed slots plus two element slots
The team is five Pals: Jetragon, Orserk and Lyleen occupy three slots, and the remaining two hold two copies of the same Pal chosen for the boss's element (source: field notes).
Why these three are fixed
Jetragon tanks and mitigates, Orserk is the main damage, Lyleen sustains and supports. All three work across elements, so they never rotate out (source: same).
Picking the two flex slots
By boss element: Dark uses Bellanoir Libero or Bellanoir, Dragon uses Orserk, Chillet Ignis or Azurmane, Ice uses Frostallion, Water uses Neptilius, and Neutral uses Paladius (source: same). That is how five team templates share one core.
Attack above thirteen thousand
The field notes' reference value: with the enhanced gun, Orserk, Lyleen, curry and accessories, any Pal can reach 13,000+ attack (source: same). That is a player's build result, not an official number; read it as "strong enough".

Palworld trait priority: Undying Body and Diamond Body
The field notes put it bluntly: Undying Body and Diamond Body are the game's T0 traits . The reason is simple, since a boss burst can delete a squishy Pal outright, and a dead Pal breaks the rotation.
Fixed-slot traits
Jetragon, Orserk and Lyleen run Vanguard, Stronghold Strategist, Healing and Special (source: same). Those cover damage, mitigation, sustain and utility, and they work across elements.
Flex-slot traits
Dark Bellanoir runs Witch, Undying Body, Diamond Body and Double-Edged Holy Sword; Dragon runs Legend plus Divine Dragon on top of Undying Body and Diamond Body, or lazily Undying Body, Diamond Body, Demon God and Serenity; Ice Frostallion keeps its native Legend and Ice Emperor and adds Undying Body and Diamond Body; Water Neptilius runs Legend, Lord of the Lake, Undying Body and Diamond Body; Neutral Paladius runs Savior, Undying Body, Diamond Body and Serenity (source: same).
It is not about damage traits, it is about survival traits
Many guides push double-edged sword, destroyer and demon god style pure damage. The field notes' verdict: do not copy glass cannons, staying alive and casting is the hard rule (source: same). Damage shortfalls can be patched with the gun and curry; a dead Pal cannot be patched at all.

Palworld tower boss loop: summon, mount, rotate
The loop has three steps: summon the Pal and let it cast a rotation, mount it and cast a rotation, then swap to the next one (source: field notes).
Summoned and mounted skills differ
The same Pal has different skills available summoned versus mounted, so doing both uses its kit twice. That is the highest-value part of the loop.
Skill picks
Dragon uses Great Dragon Comet, with Meteor Rain in the second slot by preference; Ice uses Great Blizzard Spike, Diamond Rain and either Aurora or Frost Domain; Neutral Paladius repeats Holy Wind against Moon Lord and Light of Judgement against Xenolord, and you must delete its other skills (source: same). The reason is AI: it casts whatever is available, so leaving one skill makes the repeat reliable.
The enhanced gun is the sixth team member
From the backline you keep buffing Pals with the enhanced gun, with a drone adding damage (source: same). That converts player output into Pal amplification, which is both stronger and safer.
Palworld gear and consumables: pre-fight checklist
| Item | Setup | Purpose |
|---|---|---|
| Accessories | Wumaster, Jetragon emblem, matching Pal's baton and charm | Mitigation and main-Pal amplification |
| Weapons | Enhanced gun plus drone, optionally Starlight machine gun or plasma rifle | Buffing Pals and chip damage |
| Food | Mammorest curry | Eat before every fight |
| Consumables | Recovery potions | Survive boss bursts |
| Pal item | Amplification needle | Apply right after summoning |
Curry before summoning
The curry buff is timed, so eating first covers the whole fight. Summoning first and eating later wastes a damage window.
Needle timing
Apply the amplification needle the moment the Pal appears, not after it starts losing health (source: same). It is an immediate buff, so earlier is strictly better.

Palworld's five element templates
Dark and Dragon
Dark uses Bellanoir Libero or Bellanoir repeating partner skills; Dragon uses Orserk, Chillet Ignis or Azurmane with the summon-then-mount-then-swap loop (source: field notes). These two see the most use because their coverage is widest.
Ice and Neutral
Ice Frostallion keeps native Legend and Ice Emperor, running Great Blizzard Spike, Diamond Rain and Aurora or Frost Domain; Neutral Paladius is the most flexible, repeating Holy Wind on Moon Lord and Light of Judgement on Xenolord (source: same).
Water only for phase one
Neptilius exists for the first phase of a specific slab fight, and Water overall is weak (source: same). Do not over-invest.
The lazy answer for everything else
Outside slab bosses and Xenolord, the Bellanoir sisters' laser handles most targets (source: same). That is why they are worth building early.
Palworld common mistakes
Mistake one: one main Pal only
A single main Pal collapses against its counter element. Sharing three fixed slots across five templates means you only need to build two flex Pals to cover every boss.
Mistake two: ignoring work-suitability changes
v1.0.4 dropped the work suitability required for Ancient Bark gathering to Lv. 1 (source: official v1.0.4 announcement, 2026-09-07), which makes early base staffing much cheaper. Combat and worker Pals are separate rosters; do not mix them.
Mistake three: assuming 1.0.5 nerfed your build
v1.0.5 only fixes texture loading (source: official v1.0.5 announcement). Combat values are untouched, so rebuilding from scratch because the version number changed is wasted effort.
Palworld FAQ
Can you capture tower bosses?
Not through normal play. Community capture methods rely on exploits and are not officially confirmed, so this guide does not recommend them.
How many teams do you need for all bosses?
Five element templates share Jetragon, Orserk and Lyleen, so you only need five flex Pals: Dark, Dragon, Ice, Water and Neutral (source: field notes).
How much attack is enough?
The field notes' reference is 13,000+ attack on any Pal, combined with the enhanced gun, curry and accessories (source: same). That is not an official threshold.
Do slab bosses require element counters?
Yes. Without counters they become markedly harder and the Pal army stops carrying (source: same).
Action list
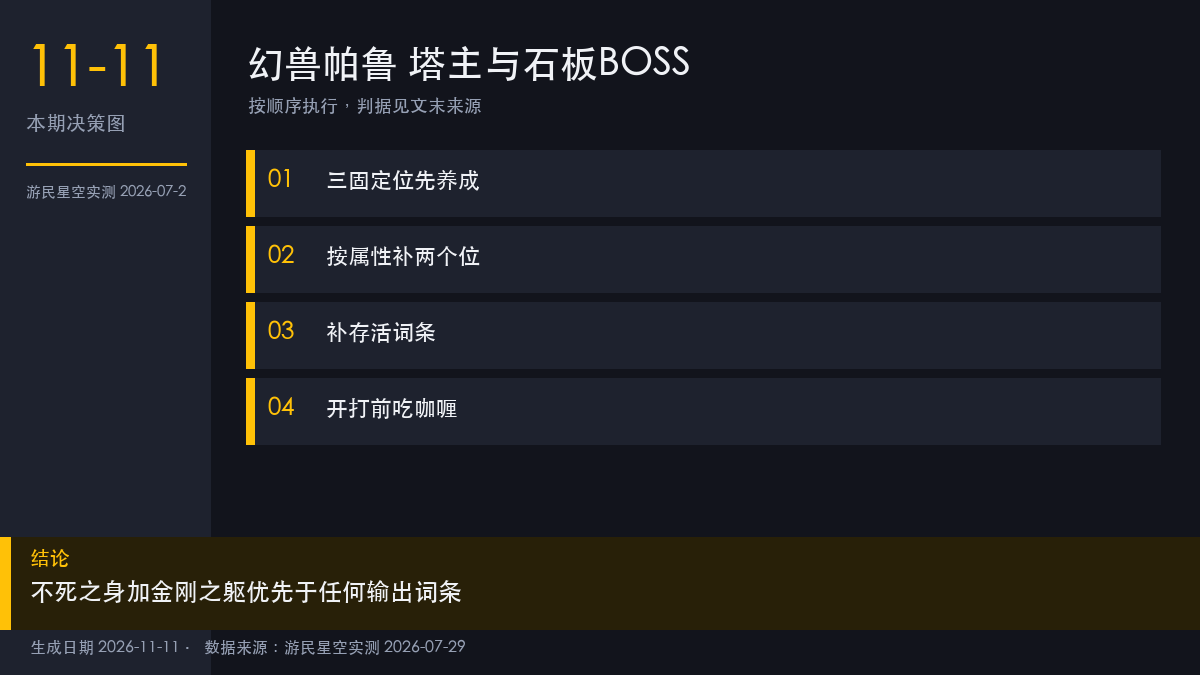
- Build Jetragon, Orserk and Lyleen first as the fixed core.
- Build Bellanoir sisters and Frostallion next for coverage.
- Add Undying Body and Diamond Body to every combat Pal before damage traits.
- Leave Paladius with a single skill so the AI stops wasting casts.
- Eat Mammorest curry, bring the gun and drone, and needle on summon.
- Swap templates per element for slab bosses instead of forcing one team.