Version 3.8 went live on November 12, 2026. The Hazard Zone resets on a cycle, and this cycle's buffs only took effect after the November 9 refresh, so building around last cycle's impressions will cost you. This piece solves exactly one problem: how to clear 36 stars with a single top-tier roster instead of ramming your head against the wrong element.
One more note: character tier lists shift every week, and we post each Wuthering Waves cycle's Hazard buff changes on gghubs.com. The Tower's scoring criteria barely move, though — there's only one: clear floors 3 and 4 within 2 minutes 30 seconds.

Wuthering Waves 3.8 Tower of Adversity: Read This Cycle's Buffs First
The Tower of Adversity is two side towers plus the Hazard Tower in the middle. Before you enter each floor, the stage screen lists that cycle's buffs, and your team direction follows from them. Don't groan at the wall of text — it's more reliable than any guide written outside the game.
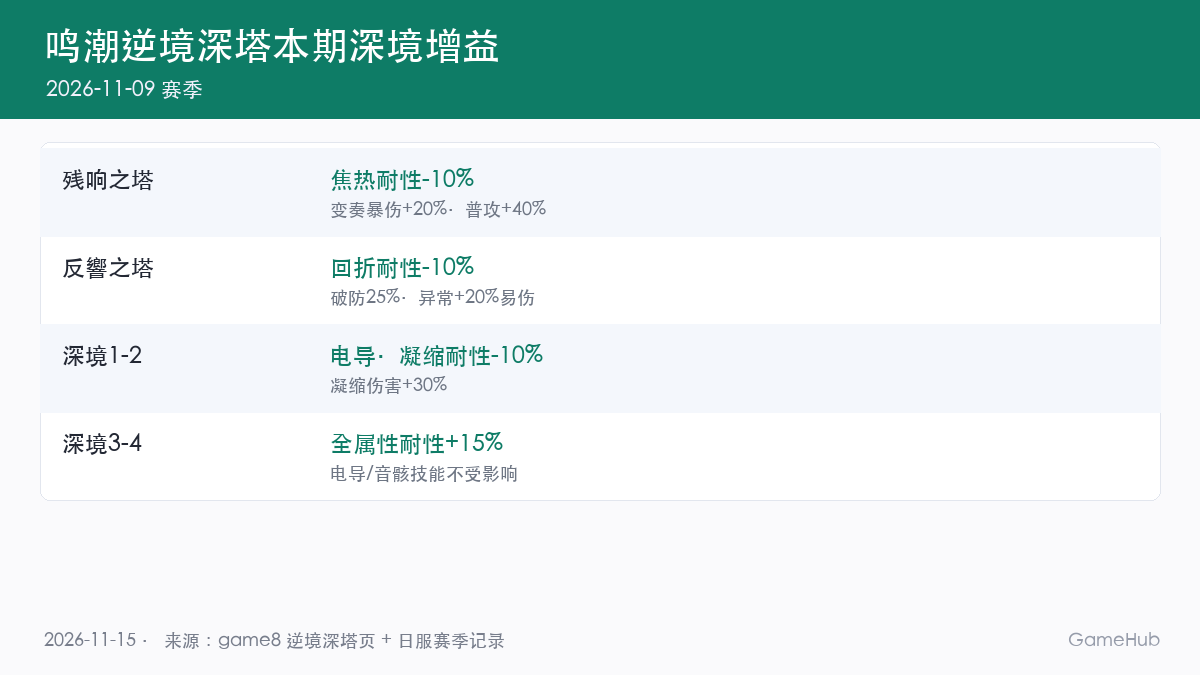
The left Resonant Tower cuts enemy Scorch RES by 10%, and while an Intro Skill is active, Crit DMG goes up 20% and Basic Attack DMG up 40%. The right Echoing Tower cuts enemy Reflux RES by 10%, makes your damage ignore 25% DEF, and adds another 20% DMG taken while the enemy is carrying an ailment. One rewards Intro Skill burst, the other rewards ailment uptime — completely different paths.
The Hazard Tower splits into two tiers, and the gap is bigger than you'd expect. Floors 1 and 2 give enemy Conduction and Condensation RES -10%, Scorch and Annihilation RES +10%, Crit DMG +25%, and your Condensation DMG +30%. Floors 3 and 4 flip the script: enemy All-Type RES +15%, and only Conduction and Echo Skill damage slip past it; Intro Skills grant the whole team +15% final DMG, applying an Electromagnetic effect grants +55% final DMG, a Chorus response grants +50% final Conduction DMG, and Echo Skill DMG gets +50%. That's a mouthful, but it is the underlying logic of team building, so it's worth reading twice. Two different playstyles sit inside one buff list — don't carry your floors 1-2 plan upstairs.

Wuthering Waves Tower of Adversity Roles: Side Towers vs. the Hazard Tower
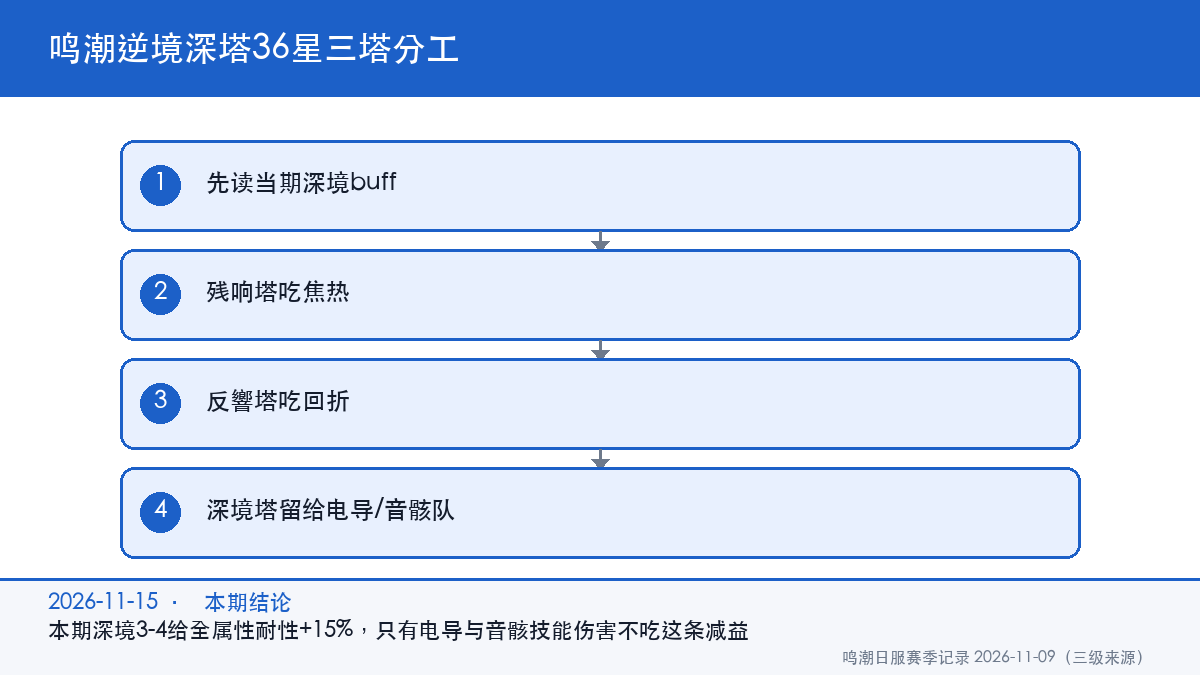
The split is simple. The left tower wants Scorch, the right wants Reflux, and since each has its own main DPS you just place characters by element — no forcing a cross-element clear. The Hazard Tower is where it gets annoying: floors 3 and 4 only accept a Conduction main DPS or an Echo Skill team, and anything else pays that 15% out of its own pocket.
Floors 1 and 2 make a decent practice slot. They hand out +30% Condensation DMG and +25% Crit DMG at a lower difficulty, which is exactly where a lineup you haven't settled on should be tested. Don't burn your most expensive team here.

Wuthering Waves Hazard 3-4: How to Get Around All-Type RES +15%
All-Type RES +15% won't stop you from killing things; it just makes you slower. And slow costs you directly on the clock: floors 3 and 4 only award three stars for a clear within 2:30.
If you're stuck here, your investment is usually fine — the trouble is that you picked the wrong damage source. In the same team, push up the share of Conduction or Echo Skill damage and that 15% never comes into play. So work out your damage split first and talk about substats second; the reverse order wastes the effort.
You can also use the buffs to pick characters. This cycle names four things — Conduction, Chorus, Echo Skill and Electromagnetic effect — and any character who hits two or more at once is basically the answer for this patch. Characters who hit none can still go in; just accept that you'll be slower.
Wuthering Waves Fatigue: Making All 10 Points Count
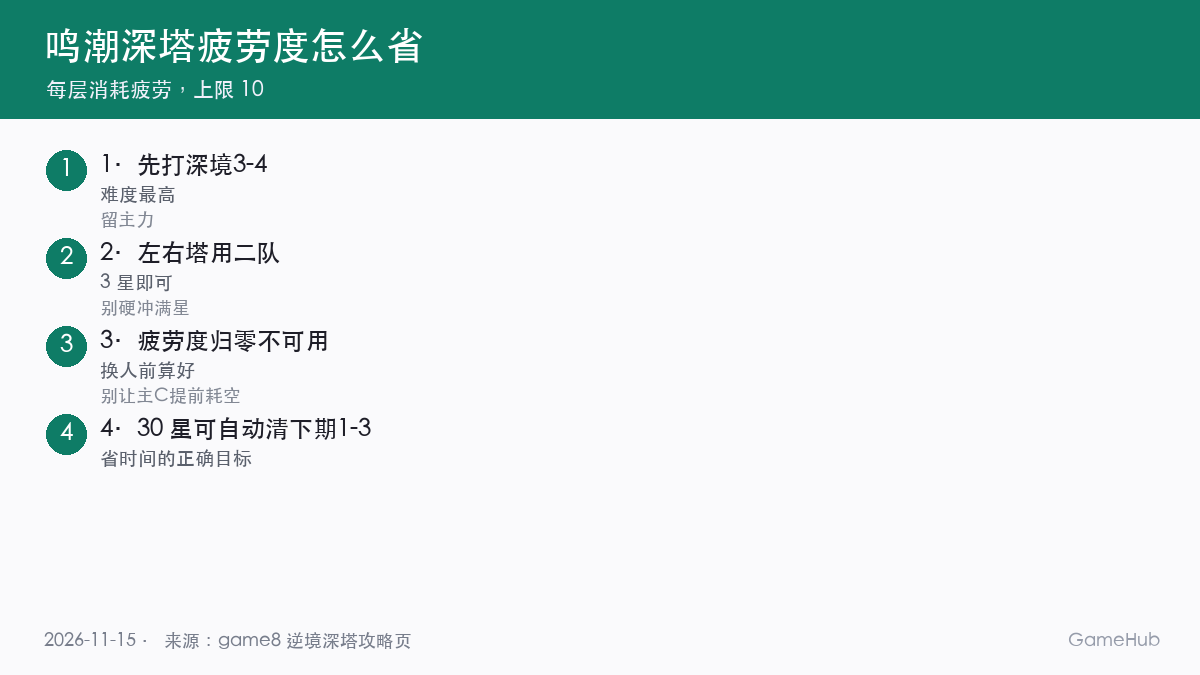
Here's the thing beginners overlook most: Fatigue. Every floor you clear drains Fatigue from the characters you used, capped at 10 points, and once a character hits zero it cannot be fielded in that zone again.
Since Fatigue is charged per character, what you actually plan is the order of appearance. Save your main force for the hardest floors 3 and 4, and send the second team through floors 1-2 and the side towers. Get the order wrong and your main DPS drains dry on easy floors; by the time you reach 3-4 there is nobody left, and reshuffling then is too late.
Resetting challenge history restores Fatigue, but you have to re-clear the reset floors with other characters before the rewards pay out again. That's a patch-up, not a routine strategy — avoid it if you can.
Wuthering Waves Tower of Adversity Teams: Three Workable Setups
These three setups can be copied outright. Left Resonant Tower: a Scorch main DPS with a DMG amp support and a healer, cashing in the Intro Skill's +20% Crit DMG and +40% Basic Attack DMG. Right Echoing Tower: a Reflux main DPS with ailment application and a survival slot, exploiting the 25% DEF ignore and the extra 20% DMG taken while the enemy is afflicted. Hazard floors 3-4: a Conduction main DPS plus a Chorus slot and an Echo Skill slot, built specifically to sidestep the +15% All-Type RES.
Honestly, these three are mechanical fit suggestions, not official recommendations — check the in-game numbers for any specific character.
If your roster is thin, pour resources into the single Hazard 3-4 team and stop at three stars on the side towers with your second team. The gap between 30 and 36 stars comes mostly from the Hazard Tower; topping up the side towers pays very little.
If your roster is deep, build all three. At that point the contest is elemental coverage rather than raw stats — with all three up, each cycle you only swap one or two slots per the buffs instead of rebuilding a team from scratch.
Wuthering Waves Tower of Adversity Rewards and Reset Cycle
The Hazard Zone resets on a cycle, and rewards can be claimed again after each reset. Once you have banked 30 stars, floors 1-3 of both side towers auto-complete the following cycle — a lot of people don't know this.
The trade-off is counterintuitive, but it genuinely saves time. Reaching 30 stars means skipping the repeated grind on two towers every cycle; push on toward 36 if you want, but for most players stopping at 30 is the sane call. Full-star rewards are Astrite, Shell Credits and Deep Zone Reports — the reports trade in at the event shop, so they don't compete with character progression and are free to pick up.
Wuthering Waves Tower of Adversity FAQ
Why can't I kill anything on Hazard floors 3-4 this cycle?
A: Enemy All-Type RES is +15%, and everything except Conduction and Echo Skill damage eats that penalty first. Switch to those two damage sources and you bypass it.
What's the time limit for three stars in the Hazard Tower?
A: Hazard floors 3 and 4 require a clear within 2 minutes 30 seconds; floors 1 and 2 are more forgiving.
What do I do when Fatigue runs out?
A: The cap is 10 points, and a character at zero cannot be fielded in the same zone type. Resetting challenge history restores it, but you have to re-clear those floors with different characters to claim the rewards.
How much more do 36 stars pay than 30?
A: 30 stars auto-completes floors 1-3 of both side towers next cycle, saving the repeat grind on two towers; the extra from 36 is mainly Astrite and Deep Zone Reports.
Action Checklist
- Read the Hazard buffs before every floor and split teams by element — don't run one setup across all three towers.
- On Hazard floors 3 and 4, lead with a Conduction main DPS or an Echo Skill team to bypass the +15% All-Type RES.
- Save your main force for floors 3 and 4 and send the second team at floors 1-2 and the side towers — don't drain your main DPS on easy floors.
- Set this cycle's target at 30 stars to unlock next cycle's auto-complete for floors 1-3.
- The three-star clock is 2:30; if you miss it, change the lineup before adding stats.