
Character first or weapon first? In this version, the answer lies in the certainty of Wuthering Waves 3.7's banners. The character banner has 80-pull hard pity, a 0.8% base 5★ rate, and a 50/50; the weapon banner has the same 80-pull pity, but any 5★ you pull within 80 is guaranteed to be the featured one. Dump the same 12,800 Astrite into either, and the weapon banner comes out decidedly more certain.
But don't write the answer down just yet.
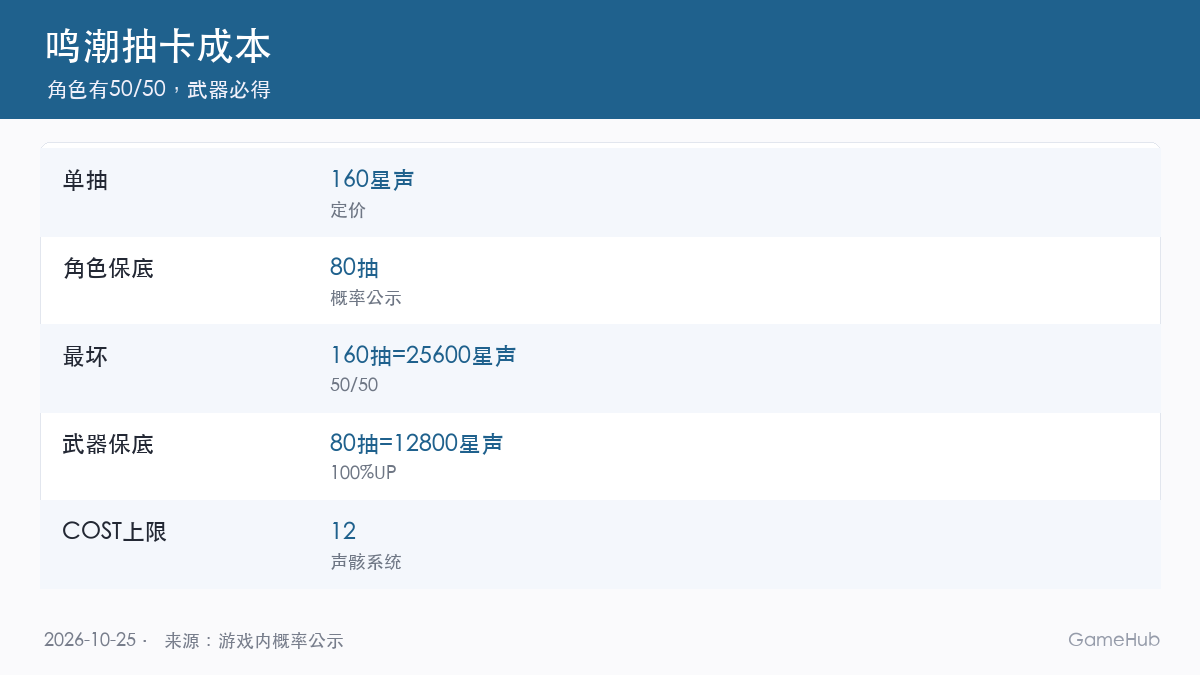
Pull Costs: 160 Astrite per Pull, 80-Pull Pity
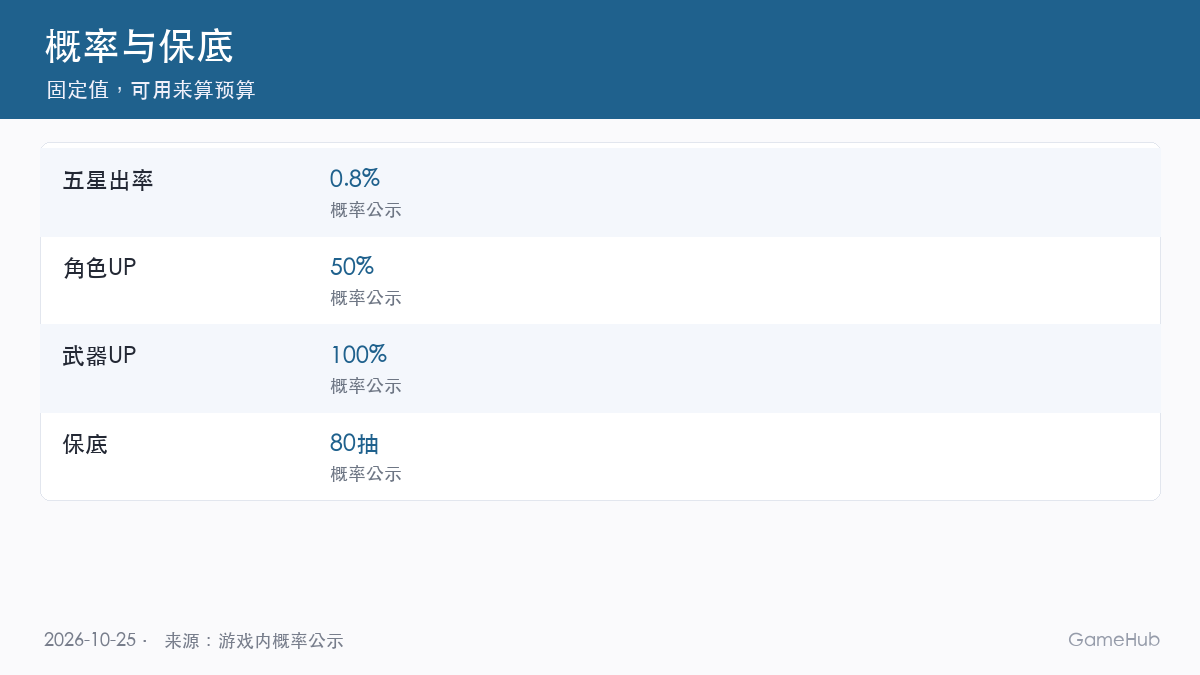
Let's put the costs on the table first. The base 5★ rate for the T0 characters on the character event banner is 0.8%, with a guaranteed 5★ within 80 pulls — but when that 5★ lands, there's only a 50% chance it's the featured character. In other words, pity does not guarantee the UP unit. In the unluckiest case you burn through two full pities — 160 pulls and 25,600 Astrite — before the character finally comes home.
The weapon banner is a different story. Same 80-pull pity, same 0.8% rate, but a 100% chance the featured weapon is what you get — no 50/50 at all. Any 5★ within 80 pulls is guaranteed to be the featured weapon. For the same 12,800 Astrite, the character banner can leave you empty-handed while the weapon banner guarantees a weapon. For free-to-play and monthly-card players, that certainty beats any number on a stat sheet.
So how should you budget? Honestly — plan for the worst case, not the average. Expected value only tells you what you'll spend on average; pity tells you what you'll spend in the worst case, and it's the worst case your Astrite wallet has to survive. Expected value is also an average stitched together from lucky pulls and tragic ones — for real players like you and me, results almost never land exactly on the mean. Budgeting Astrite for the worst case is the only math that never blows up.
Resonance Chain: Which Node Is the Real Leap
Costs settled, a new question follows: once the character is in hand, should you keep pulling for constellations? The Resonance Chain is the upgrade path unlocked by drawing duplicates of the same character — six nodes in total, each with its own effect. Nodes 2 and 6 are usually the real turning points, either in rotation or in raw multipliers.
Node 1 mostly stacks numbers, while Node 2 tends to change mechanics — skill rotation, energy regeneration, status overwrites, all of it. How do you judge whether a node is worth it? Read the description: wording like "extra," "reset," and "extend" signals more value than a plain percentage. For the 3.7 roster specifically, the 3.7.2 patch notes don't list Resonance Chain values node by node — treat the in-game character screen as the source of truth.
Let's be blunt about Node 6. It demands five more copies of the same 5★ character; at 80-pull pity, that's up to 400 extra pulls and 64,000 Astrite in the worst case. That's no longer a power-up — it's the budget for rebuilding an entire team. Unless you've decided this character will be your one and only carry, the same Astrite buys far more reliable value as a signature weapon plus a new character.
Echo COST Allocation: Making the 4-3-3-1-1 Split Work
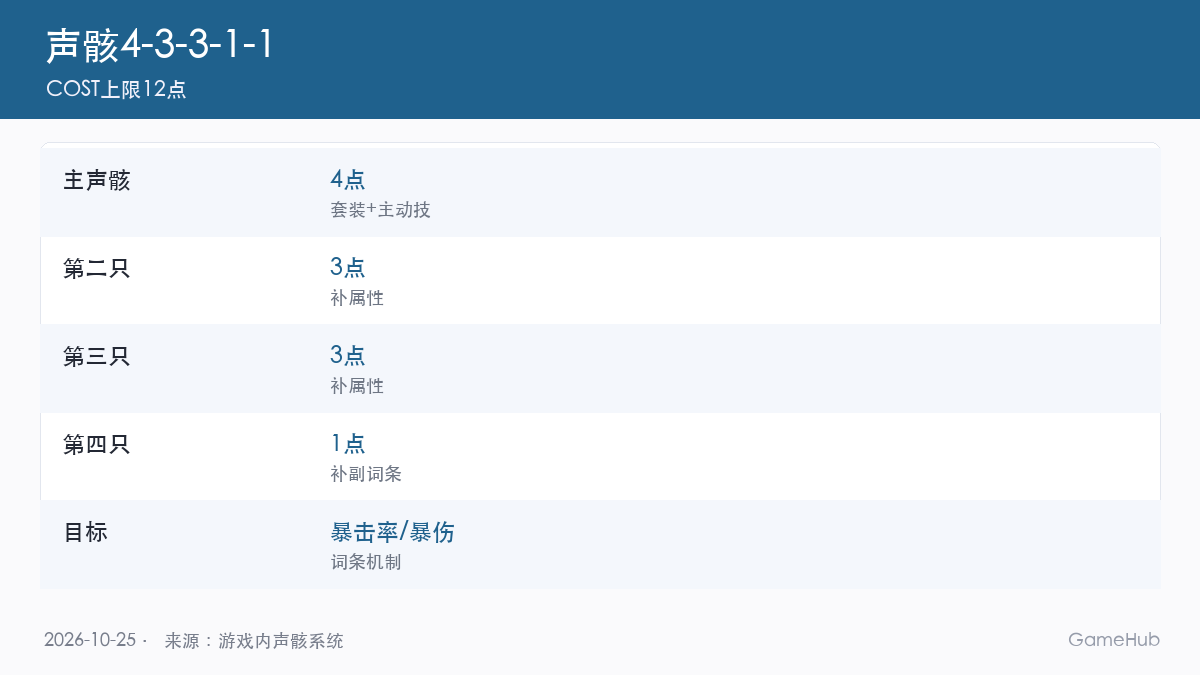
Constellations done — on to gear. Echoes have a COST cap of 12, and the mainstream build is 4-3-3-1-1. Don't underestimate those numbers: testing shows that if the main Echo carries the wrong set bonus, no amount of substat stacking on the others makes up for that 30% set gap.
The main Echo takes 4 COST and governs the set bonus and active skill — pick wrong and the whole build goes to waste. How to choose? First check which damage type the character deals, then check whether the main Echo's active skill buffs that type. The same set often offers more than one main Echo; prefer the one with a short cooldown that covers your burst window.
Fill the remaining slots with 3, 3, 1, and 1. Substats have a clear priority: CRIT Rate and CRIT DMG come first, then ATK%, then Energy Regen, with Attribute DMG at the bottom. Energy Regen only deserves priority when your rotation is breaking down; when the rotation flows smoothly, it underperforms ATK%. One more reality check: substats can't be rerolled — you can only swap the Echo. So an Echo with the right main stat but entirely wasted substats is worth less than one with the right main stat and even a single CRIT substat.
Signature Weapons and 4★ Alternatives
Gear done, time for weapons. A signature weapon's value lies not only in its stat line but in how tightly it couples with the character's mechanics. Many signature weapons boost a resource unique to that character — and that's precisely what a 4★ alternative can never replicate.
When is a signature weapon mandatory? When the character's core loop depends on the resource the weapon provides, the gap against an alternative gets magnified. The test is simple: check whether the weapon description directly names the character's unique state or buff. If it does, it's basically a must-have. For the current featured weapon on the 3.7.2 weapon banner, defer to the in-game announcement — the patch notes don't list the specific banner contents.
So when does a 4★ work? Two conditions. The main stat must be right — CRIT Rate, CRIT DMG, or ATK% — and the refinement rank must be at least 3. Low-refinement substitutes fall visibly behind in long fights; when it's time to upgrade, don't hesitate.
Here's the safe route for free-to-play players: the character first, then a substitute weapon, then graduate your Echoes, and only then consider the signature weapon.
Character or Weapon — Which One First?
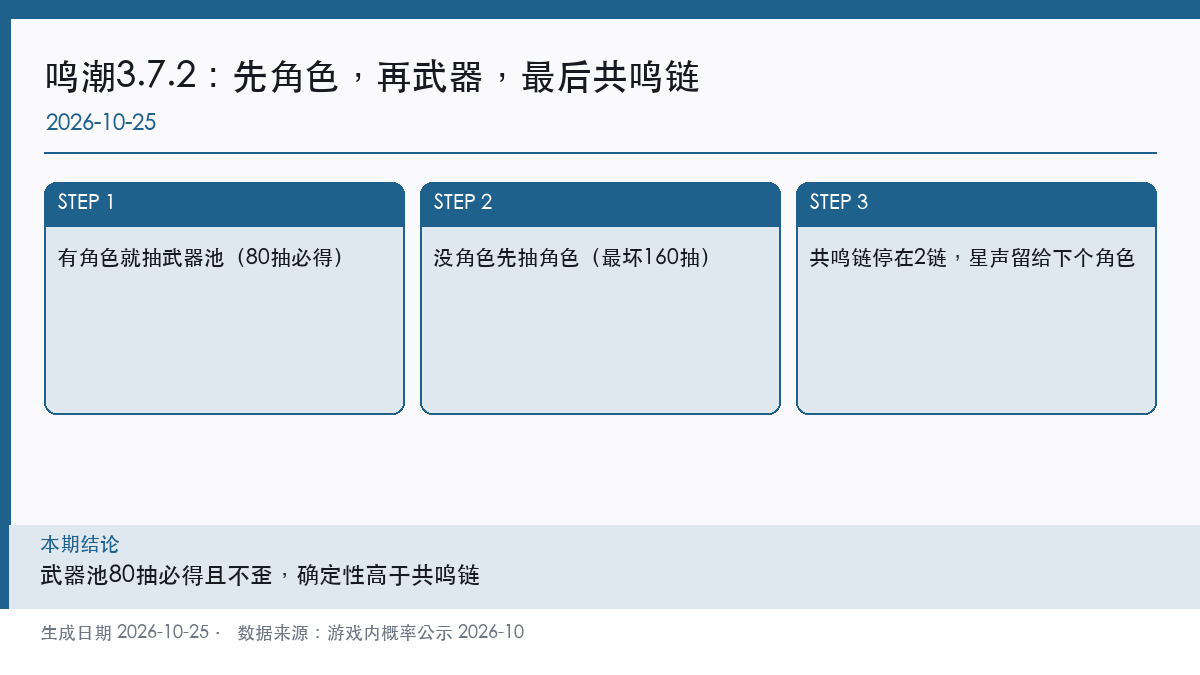
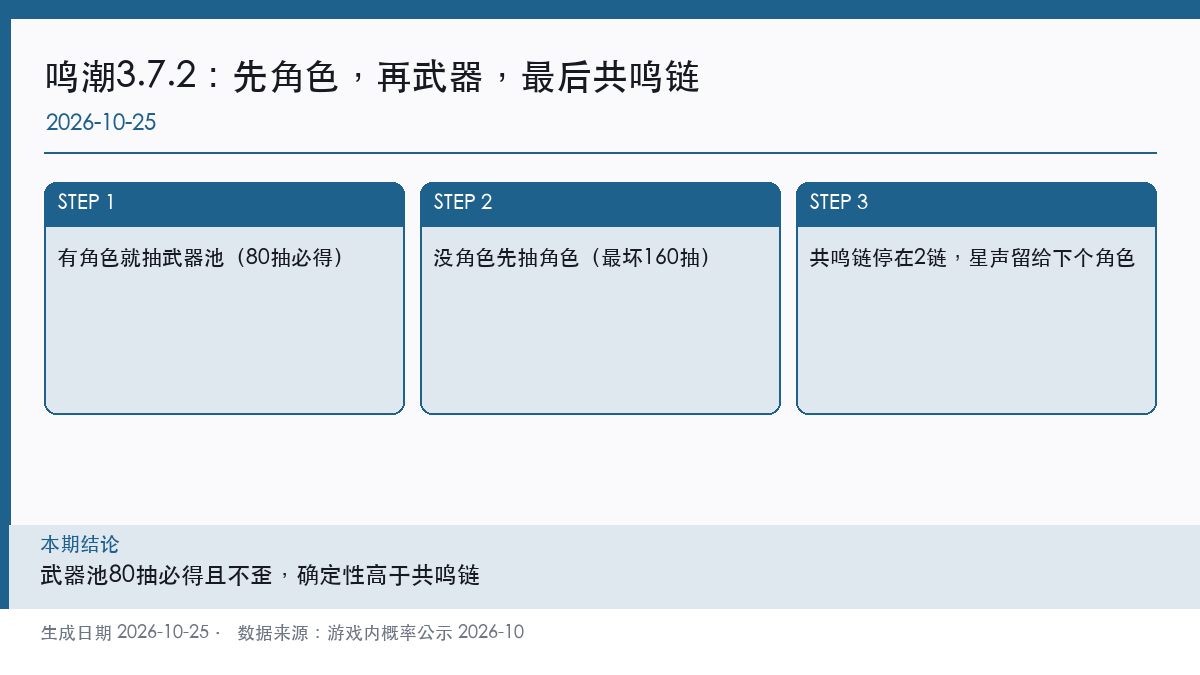
Four ledgers settled, time to wrap up. Ranked by certainty: the weapon banner comes before constellations, and the character comes before the weapon banner. The reason is simple — without the character, neither the weapon nor the constellations have anything to attach to.
- No character yet: pull the character first and budget for a worst case of 160 pulls.
- Character but no signature weapon: prioritize the weapon banner — guaranteed within 80 pulls.
- Character and signature weapon in hand: then consider Node 1 or 2 — don't jump straight to Node 6.
Back to the opening question — character first or weapon first? By now you should have your answer. Secure the character, lock in the weapon, and leave constellations for last. Spend your Astrite where it counts, and this version will have been worth the wait.
Wuthering Waves 3.7.2 FAQ
Are there new characters in 3.7.2?
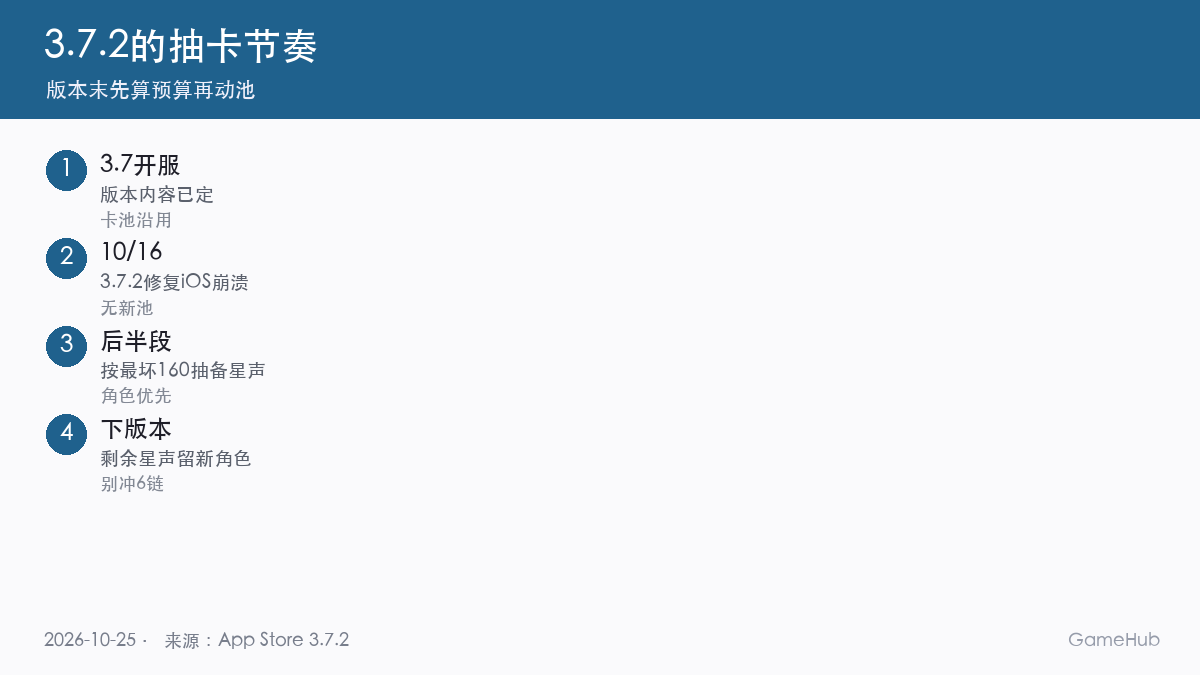
A: 3.7.2 is a maintenance patch that only fixes crashes on certain iOS devices; the banners and roster carry over from 3.7.
What's the worst-case pull count on the character banner?
A: Under the 50/50, the worst case is two full pities — 160 pulls, or 25,600 Astrite at 160 Astrite per pull.
Can the weapon banner go off-banner?
A: No. Any 5★ within 80 pulls is guaranteed to be the featured weapon; there is no 50/50.
How should Echo COST be allocated?
A: The cap is 12; the mainstream split is 4-3-3-1-1, with the main Echo taking 4 COST for the set bonus and active skill.
How many Resonance Chain nodes are enough?
A: For most characters, Nodes 1–2 are enough. Node 6 requires up to 400 extra pulls and 64,000 Astrite — not recommended for free-to-play players.
Wuthering Waves 3.7.2 Action Checklist
- First confirm whether you have the character; if not, pull for them and budget Astrite for a worst case of 160 pulls.
- Have the character but no signature weapon? Prioritize the weapon banner — guaranteed within 80 pulls, and more certain than constellations.
- Build Echoes in a 4-3-3-1-1 split: lock in the main Echo's set bonus first, then pick the active skill.
- For substats, only CRIT Rate, CRIT DMG, and ATK% matter; add Energy Regen once the rotation starts breaking down.
- Stop constellations at Nodes 1–2 and save the remaining Astrite for the next character.
Pull rates and pity rules are fixed values published by the developers, while banner contents change with each version — check in-game announcements for the current featured characters. If you want to track your pull pacing version by version, head to the gacha-guide section on GameHub for the latest banner roundups.